Learn how to add powerful AI features to your existing application — without rewriting a single line of existing code.
✓ Architecture✓ Data Governance✓ AI Agents✓ Integration✓ 4 hrs hands-on
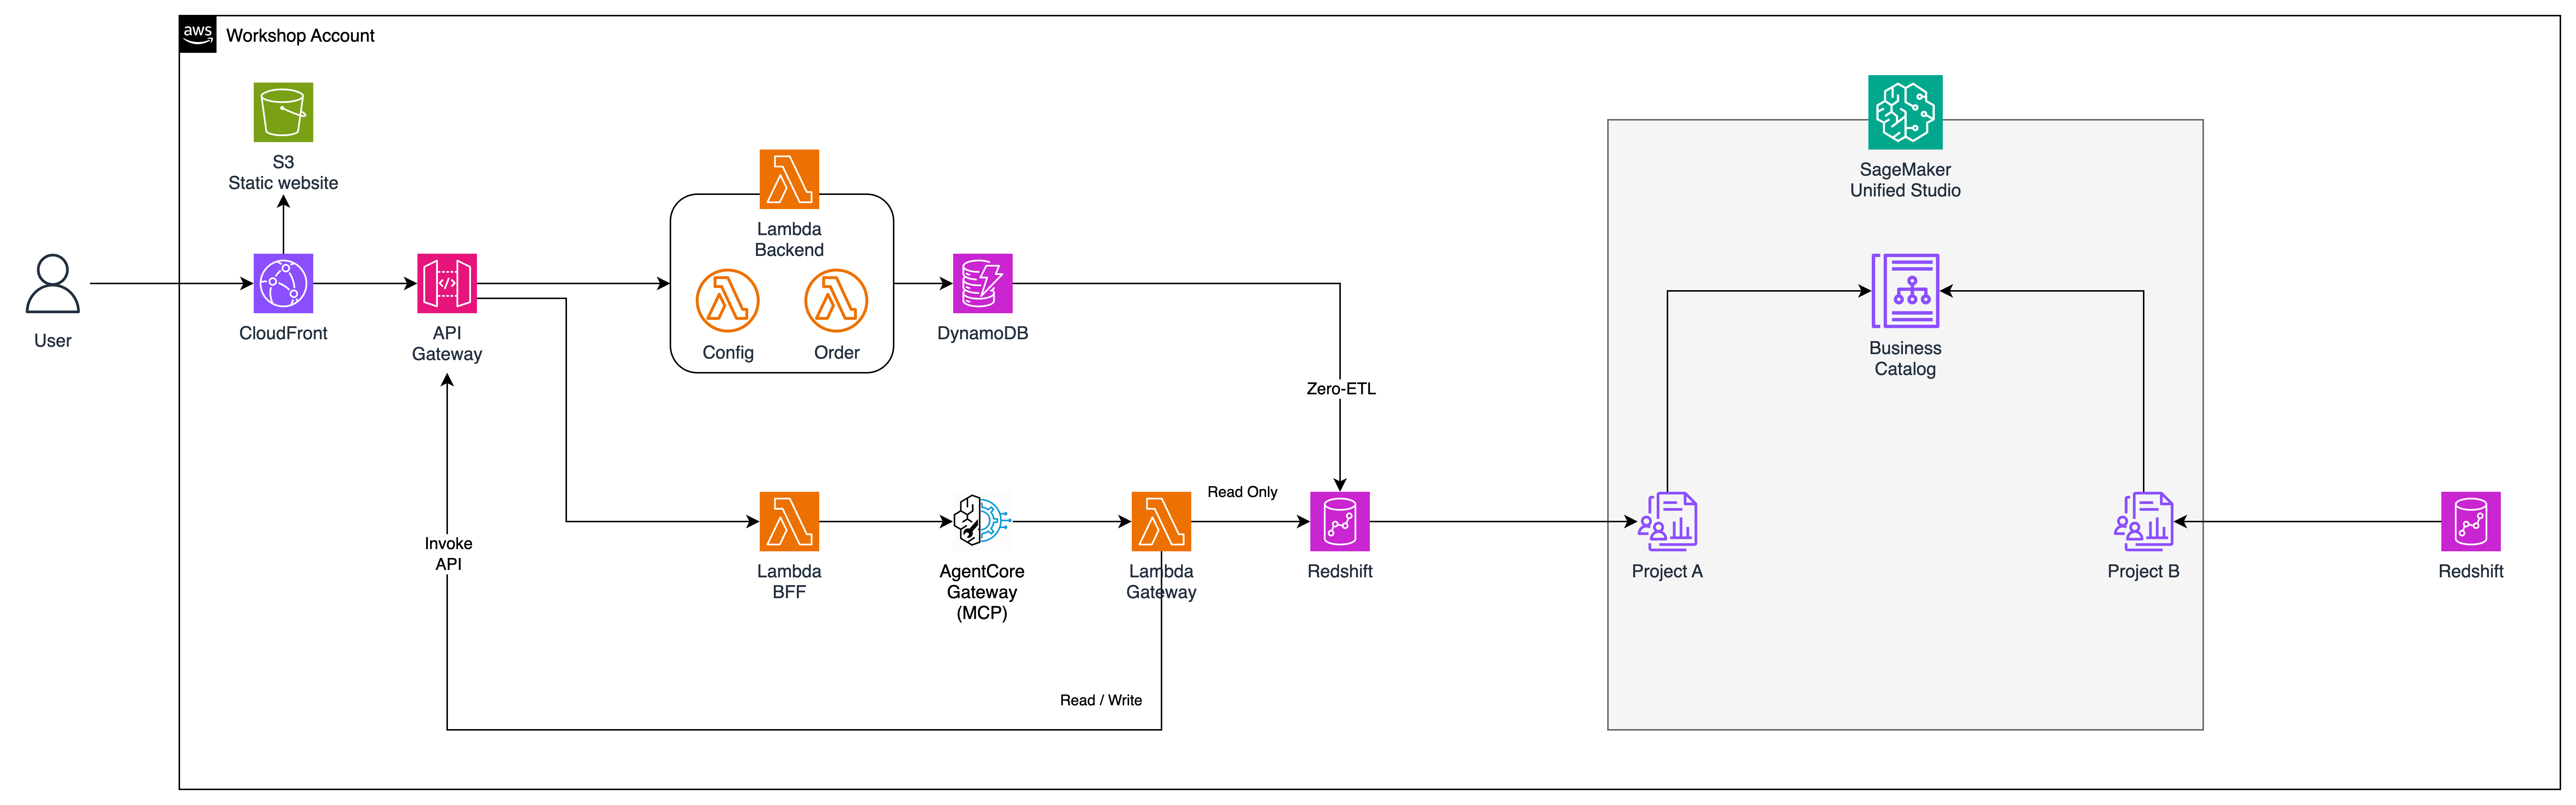
The Story — Why We Are Building This
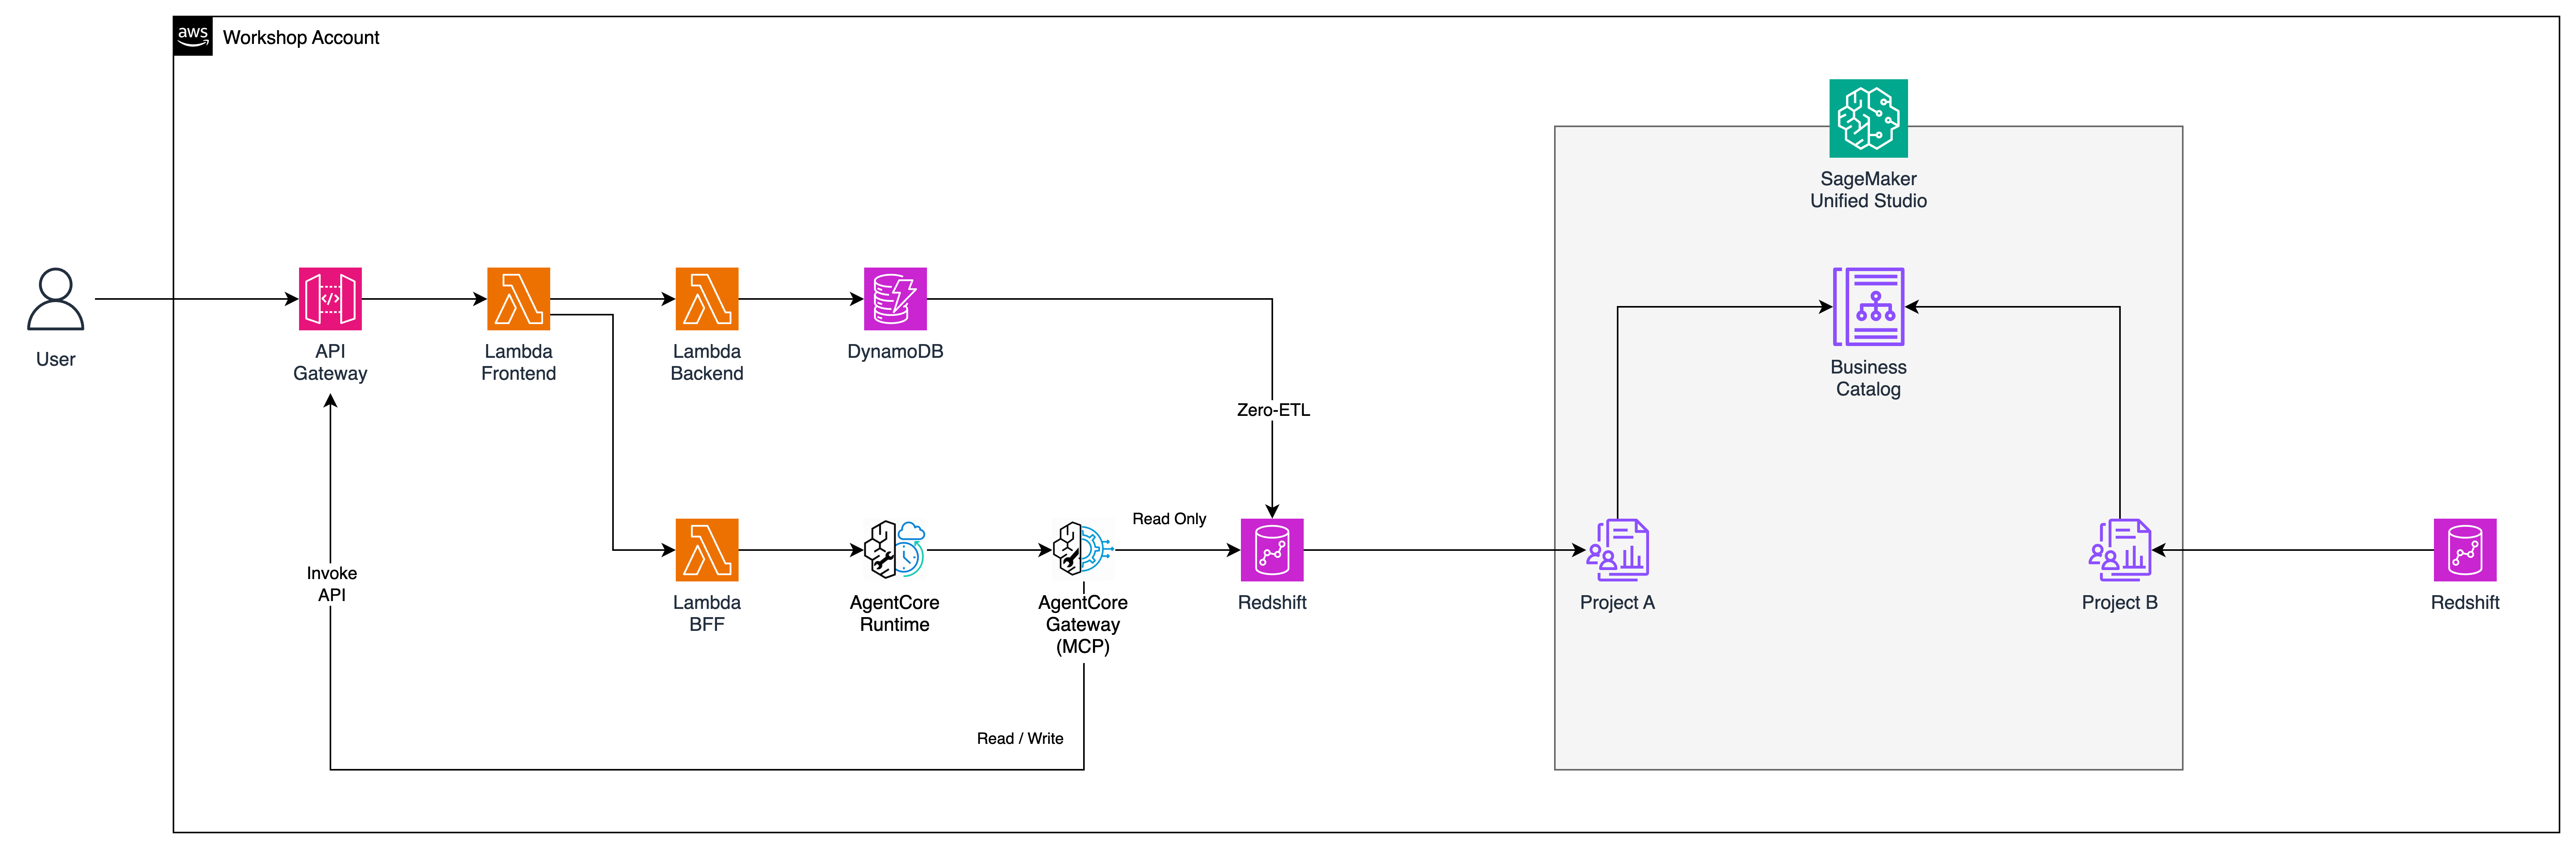
Click image to view full size
The Business Context
DailiTech is an e-commerce company. You are an engineer. The company has a working application: customers browse products, place orders, track purchases. All data lives in DynamoDB. The analytics team also has a Redshift data warehouse with historical trends, customer segments, and revenue analytics. Both systems are healthy and in production. Nobody wants to rewrite them.
The Request
One day the business team asks: "Can we have something that answers questions about our customers? Like, which segment is at risk? Who hasn't ordered lately? Can the AI even create an order for a customer who calls in?" The answer is yes — but not by rebuilding the application. The answer is the AI Brick pattern.
The Two Teams
Data Team (Producer)
"We own the Redshift warehouse. We publish curated, governed data. We approve who gets access."
AI / Engineering Team (Consumer)
"We build the AI agent. We subscribe to governed data. We connect AI to the existing app without touching it."
What You Will Build
Before: Working e-commerce app (no AI, no Redshift)
After: Same app + Redshift data warehouse + AI agent that reads analytics and can create orders, plugged in as /ai/ask endpoint
The AI Brick reads analytics from Redshift and acts through the existing API — both existing systems unchanged.
The AI Brick Concept: An AI Brick is not a replacement. It is an additive piece of architecture that you slot in beside existing systems. The existing API keeps running. The AI feature sits next to it. Pick it up, configure it, place it down.
Module 0 — Deploy the Existing Application
Duration
~20 min
Hands-On Level
Deploy stacks
Stacks
2 CloudFormation
Goal
Working app — no AI yet
In this module you deploy the existing e-commerce application — networking and the app itself. This is the "before" state: a real working API backed by DynamoDB, with no AI and no Redshift yet.
The data warehouse (Redshift) and governance layer (SageMaker) are deployed later in Module 2, when you start building the AI layer.
2 CloudFormation stacks — networking first, then the application
Download Module 0 Templates
Download both YAML templates below, then deploy in order through the AWS CloudFormation console: Create Stack → Upload a template file.
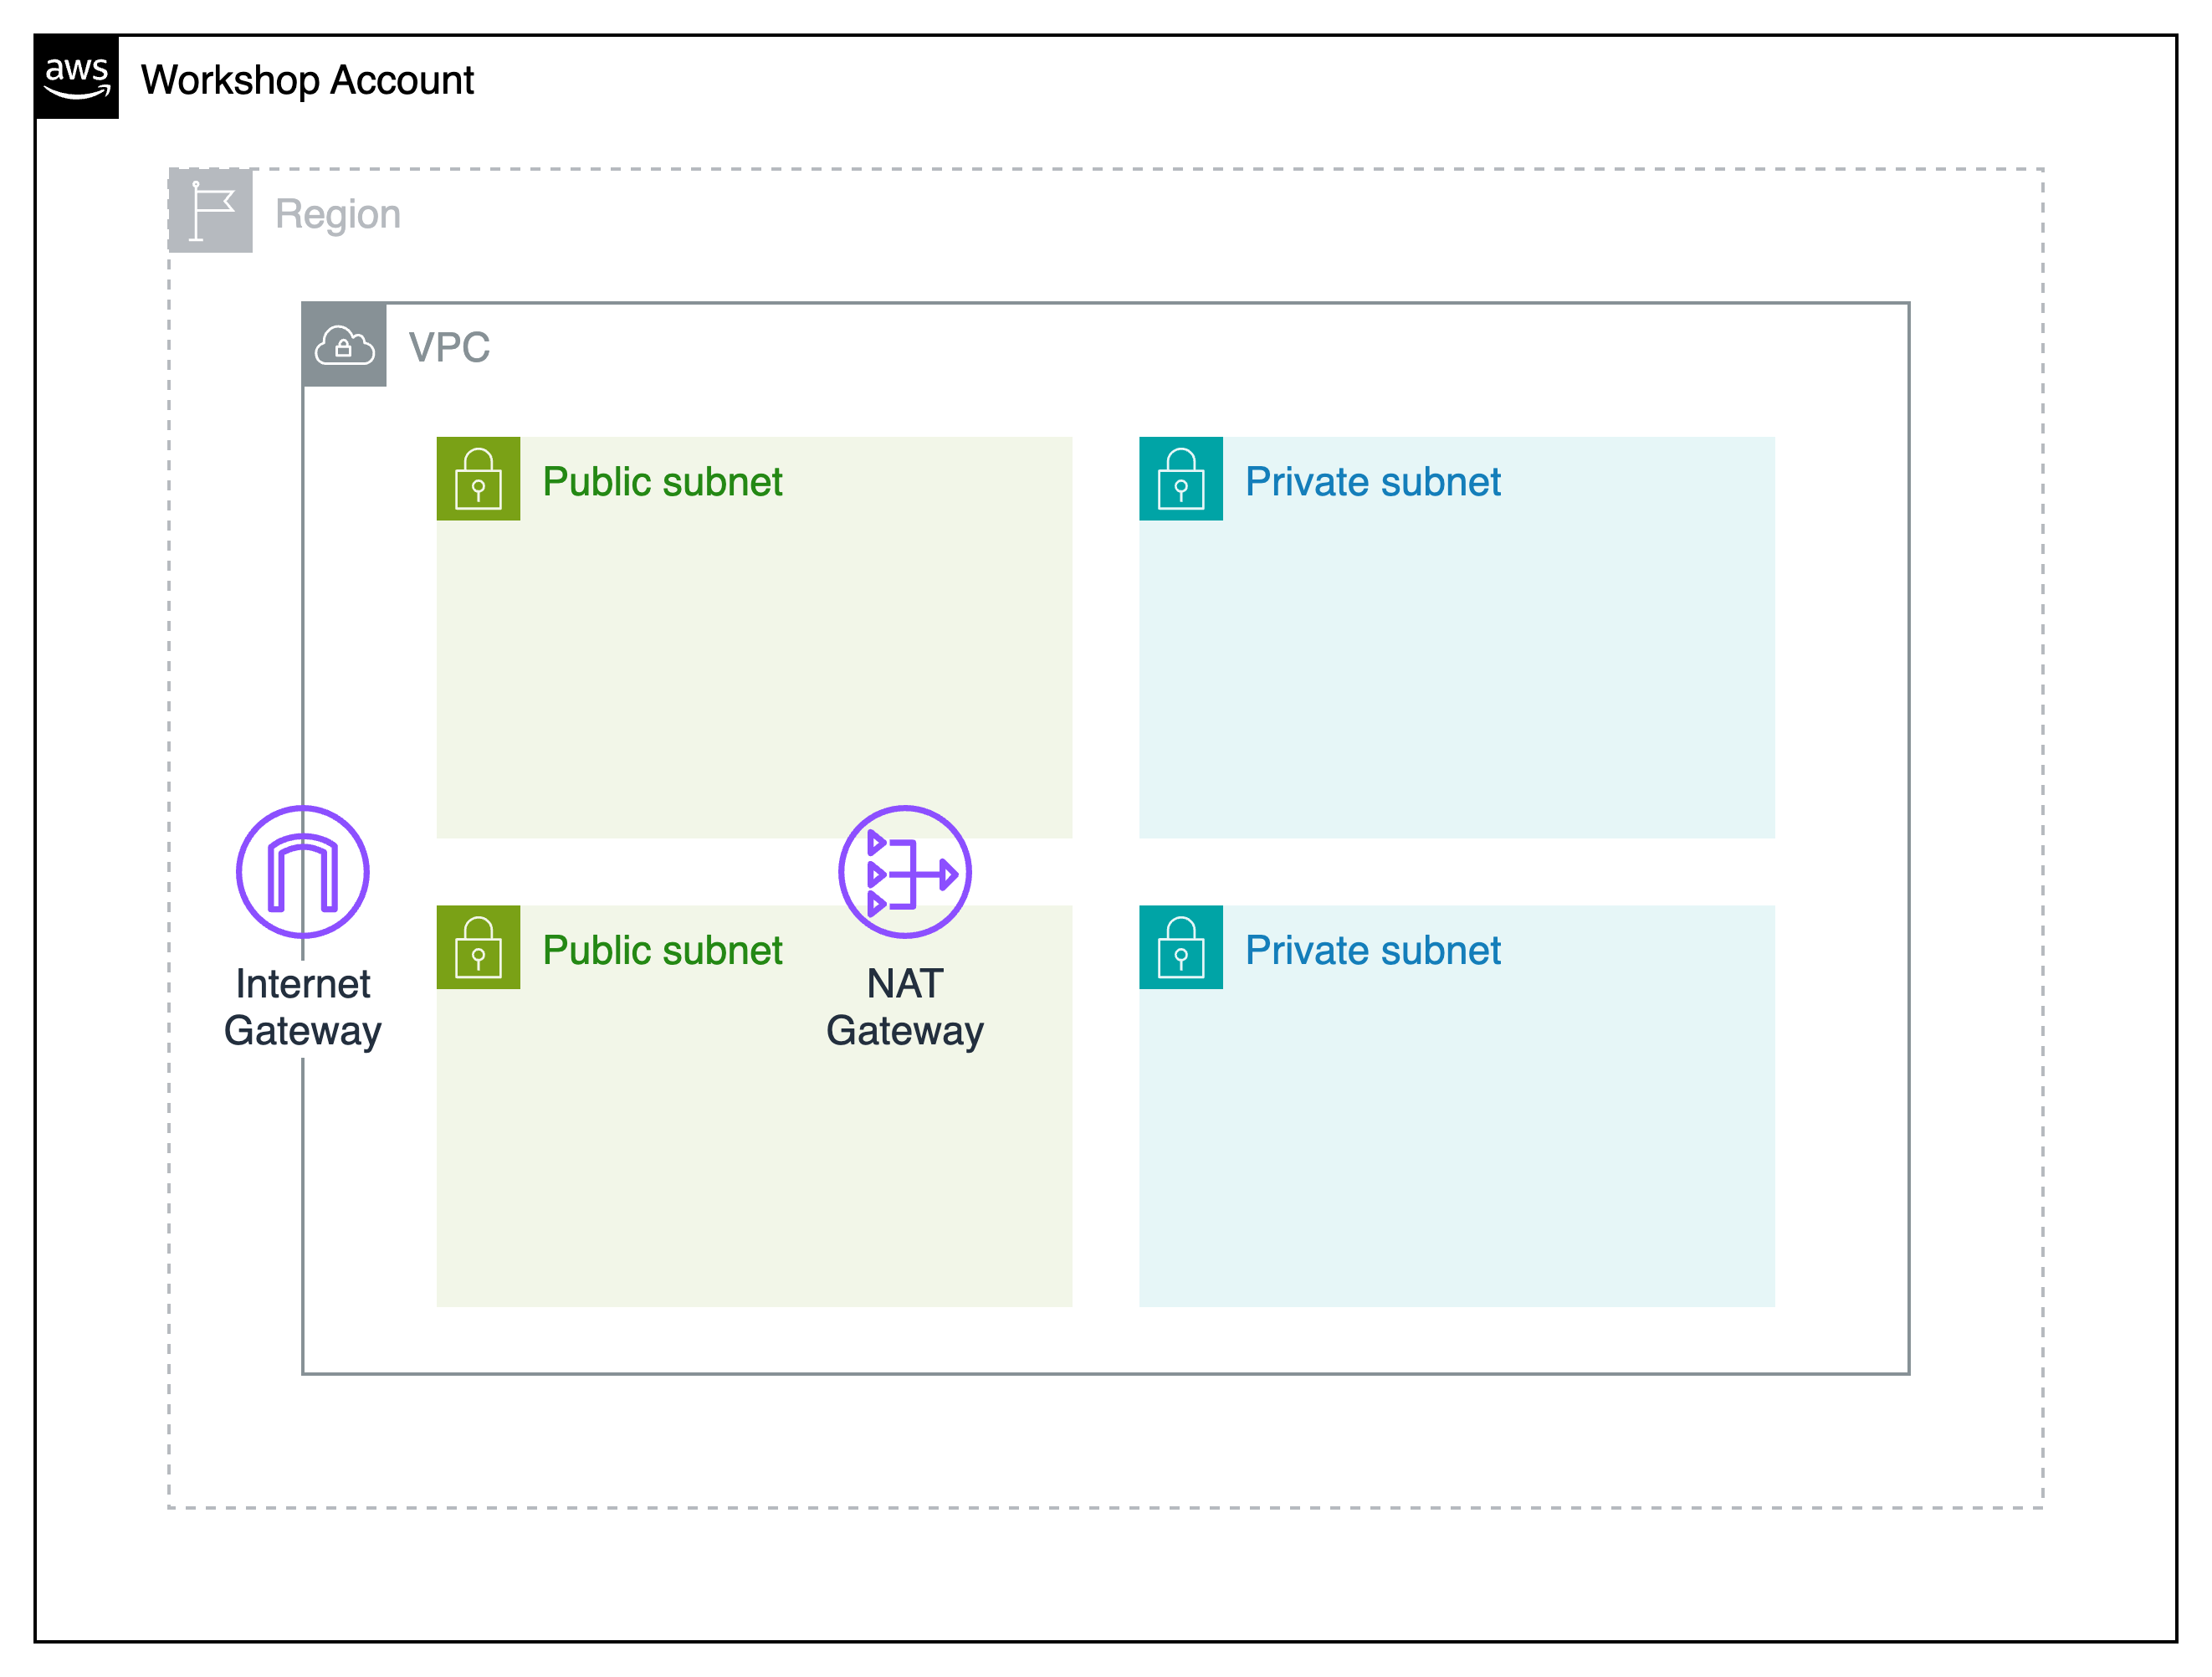
VPC, Subnets, Gateways, Security Groups, IAM Roles
This stack creates the networking layer: VPC with public and private subnets, Internet Gateway, NAT Gateway for private subnet egress, Security Groups for ingress rules, and IAM roles and policies for all services.
Click Create stack, select Upload a template file, and upload stack-0a-networking.yaml.
Name your stack
Use stack name: aibrick-0a-networking
Accept defaults and deploy
Click through the next pages, then click Create stack at the end. Wait for status to become CREATE_COMPLETE.
02E-Commerce Applicationstack-0b-application.yaml
Stack 0B
API Gateway, Lambda, DynamoDB, S3 Web App, CloudFront
This stack creates the working e-commerce application. It includes REST API Gateway, Lambda functions for product queries and order management, DynamoDB tables (products, orders, customers), and a static web app served via S3 + CloudFront.
Depends on: Stack 0A (values are fetched automatically via cross-stack exports)
No manual cross-stack values needed
Stack 0B fetches all networking values from Stack 0A automatically using CloudFormation cross-stack exports. The only parameter you set is ProjectName — just keep it the same as Stack 0A.
Parameter ProjectName: leave it as aibrick (must match Stack 0A).
Click through to Create stack. Wait for CREATE_COMPLETE (~3 min).
Open the webapp from Outputs
Go to the Outputs tab of aibrick-0b-application. Copy the WebAppURL value and open it in a new browser tab.
You should see the AI Brick Shop with Products, Customers, and Orders tabs loading with real data. The API URL is automatically injected by the stack — no manual configuration needed.
Note the Outputs tab values
The Outputs tab shows WebAppURL (CloudFront) and ApiGatewayUrl (API endpoint). You don't need to copy these manually — later modules auto-detect them from CloudFormation. But it's good to know where they are.
📦 Redshift & SageMaker come later — in Module 2
The data warehouse (Stack 0C — Redshift) and governance layer (SageMaker Unified Studio — optional, manual setup) are set up in Module 2, when you begin building the AI layer. This keeps Module 0 clean — it only represents the existing application before any AI work.
Module 0 Checkpoint
Module 1 — Explore Your Application
Duration
~20 min
Stack
Stack 0B Outputs
Tools
curl / Postman
Goal
Understand the baseline app
Now that your infrastructure is deployed, let's explore the working e-commerce application. This is the "before" state — a fully functional API with no AI features yet. In later modules, you will add AI as a new layer on top.
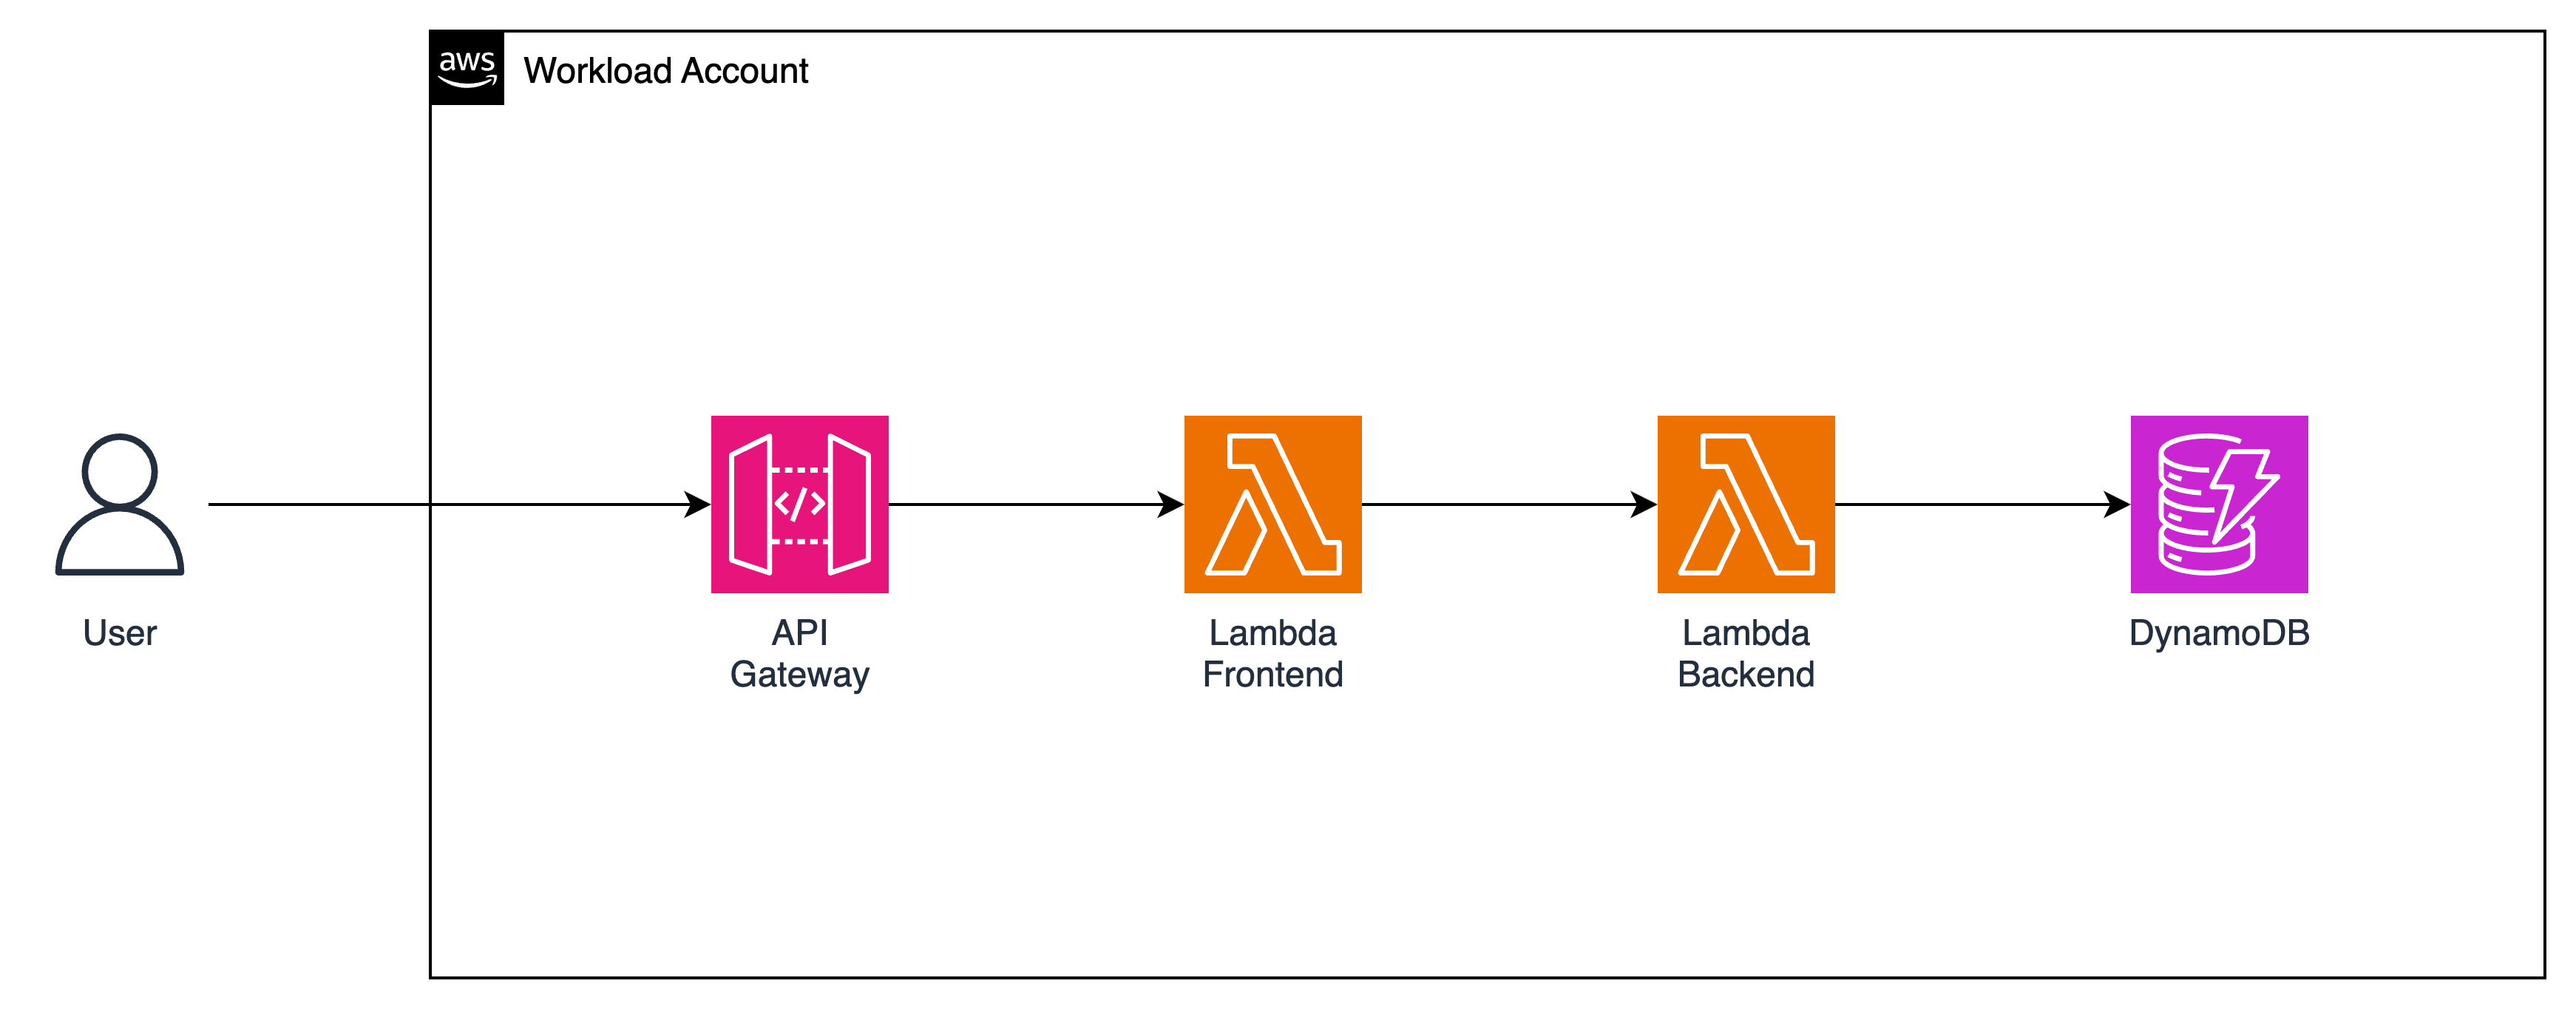
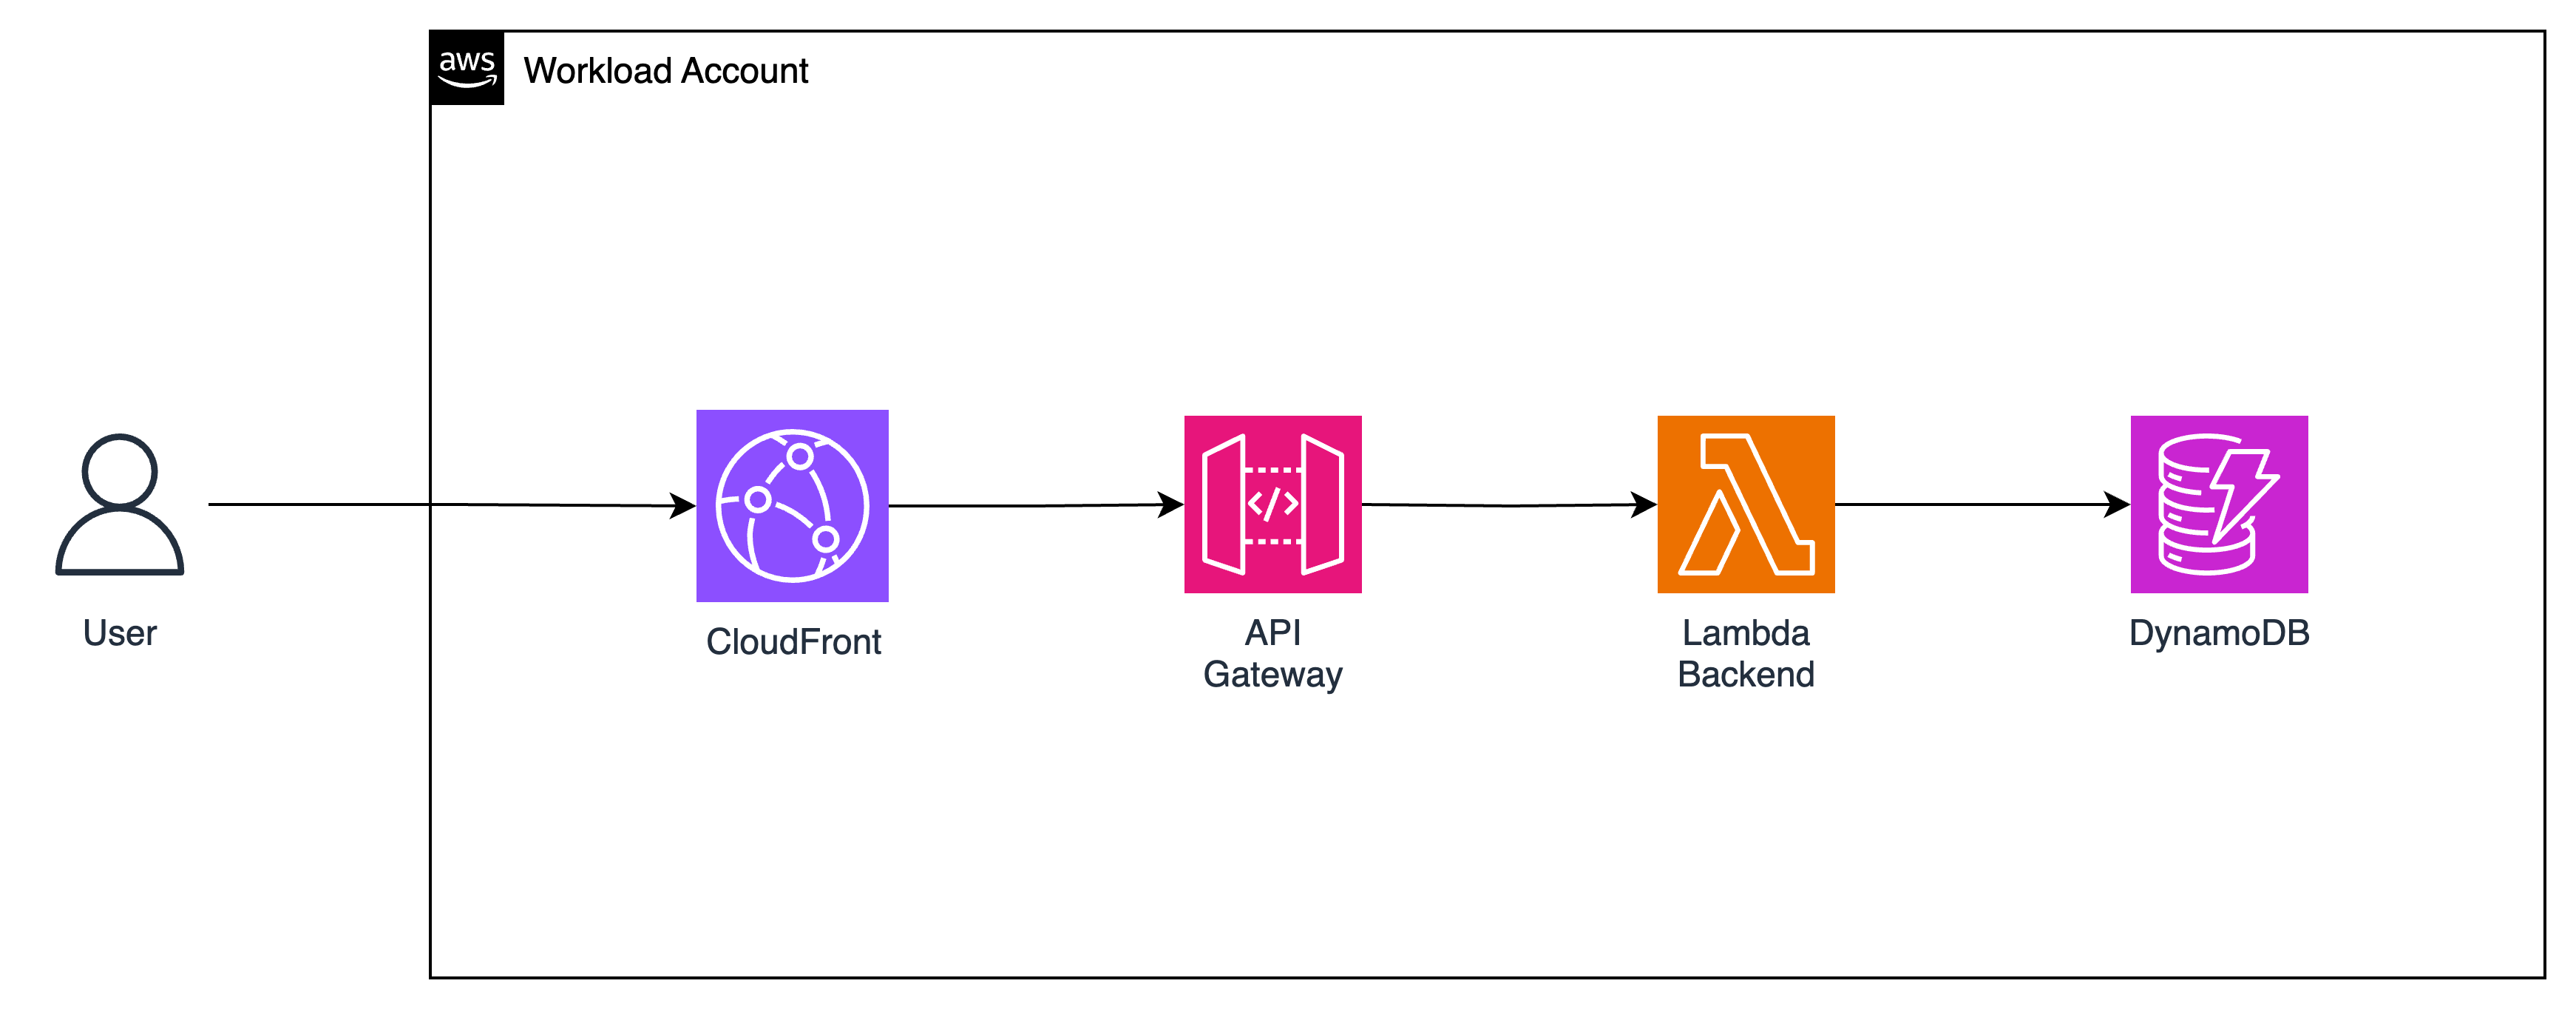
The Application Architecture
The API is built on AWS Lambda and API Gateway. It exposes these endpoints:
Your baseline e-commerce app (Stack 0B) — Client → API Gateway → Lambda → DynamoDB
Endpoint
Method
Purpose
/products
GET
List all products
/customers
GET
List all customers
/customers/{id}
GET
Get customer profile + their orders
/orders
GET
List all orders (newest first)
/orders
POST
Create a new order
/config
GET
App config (aiEnabled flag)
Test the API
Open CloudShell
All CLI commands in this workshop are run in AWS CloudShell. Open it from the AWS Console toolbar (top right, terminal icon) or use the link below.
Find the aibrick-0b-application stack. Open Outputs and copy the ApiGatewayUrl value (e.g., https://xyz.execute-api.ap-southeast-1.amazonaws.com/prod).
List products
Open your terminal and run:
# Auto-detect from CloudFormation, or replace manually from Stack 0B Outputsexport API_URL=$(aws cloudformation describe-stacks \
--stack-name aibrick-0b-application --region ap-southeast-1 \
--query "Stacks[0].Outputs[?OutputKey=='ApiGatewayUrl'].OutputValue" \
--output text)
echo "API URL: $API_URL"curl $API_URL/products
You should see a JSON array of 30 products in the ecommerce catalog.
Browse the aibrick-products, aibrick-orders, and aibrick-customers tables and click "view table details" to see the actual data in each table.
Key Insight
This application is live and in production. Real customers are using it. The code is stable. You are not going to rewrite it. In the next modules, you will layer AI on top of it using the AI Brick pattern.
Explore the Webapp
Open the WebAppURL from Stack 0B Outputs in your browser. Try these:
Browse Products
Click any product card to see its details — price, stock level, category. There are 30 products across 5 categories.
Browse Customers
Click the Customers tab. Click any customer card to see their profile and recent orders. Notice the Gold/Silver/Bronze segments and total spend.
View Orders
Click the Orders tab. You will see 200 seeded orders with status badges (PLACED, SHIPPED, DELIVERED). Try the + Place Order button and scroll down to the end of order list to create a new order through the webapp.
Module 1 Checkpoint
Module 2 — Data Warehouse, Governance & Zero-ETL
Duration
~50 min
Stacks
0C + Zero-ETL Script
Tools
Redshift Query Editor V2
Goal
2 Redshift + Governance + Zero-ETL
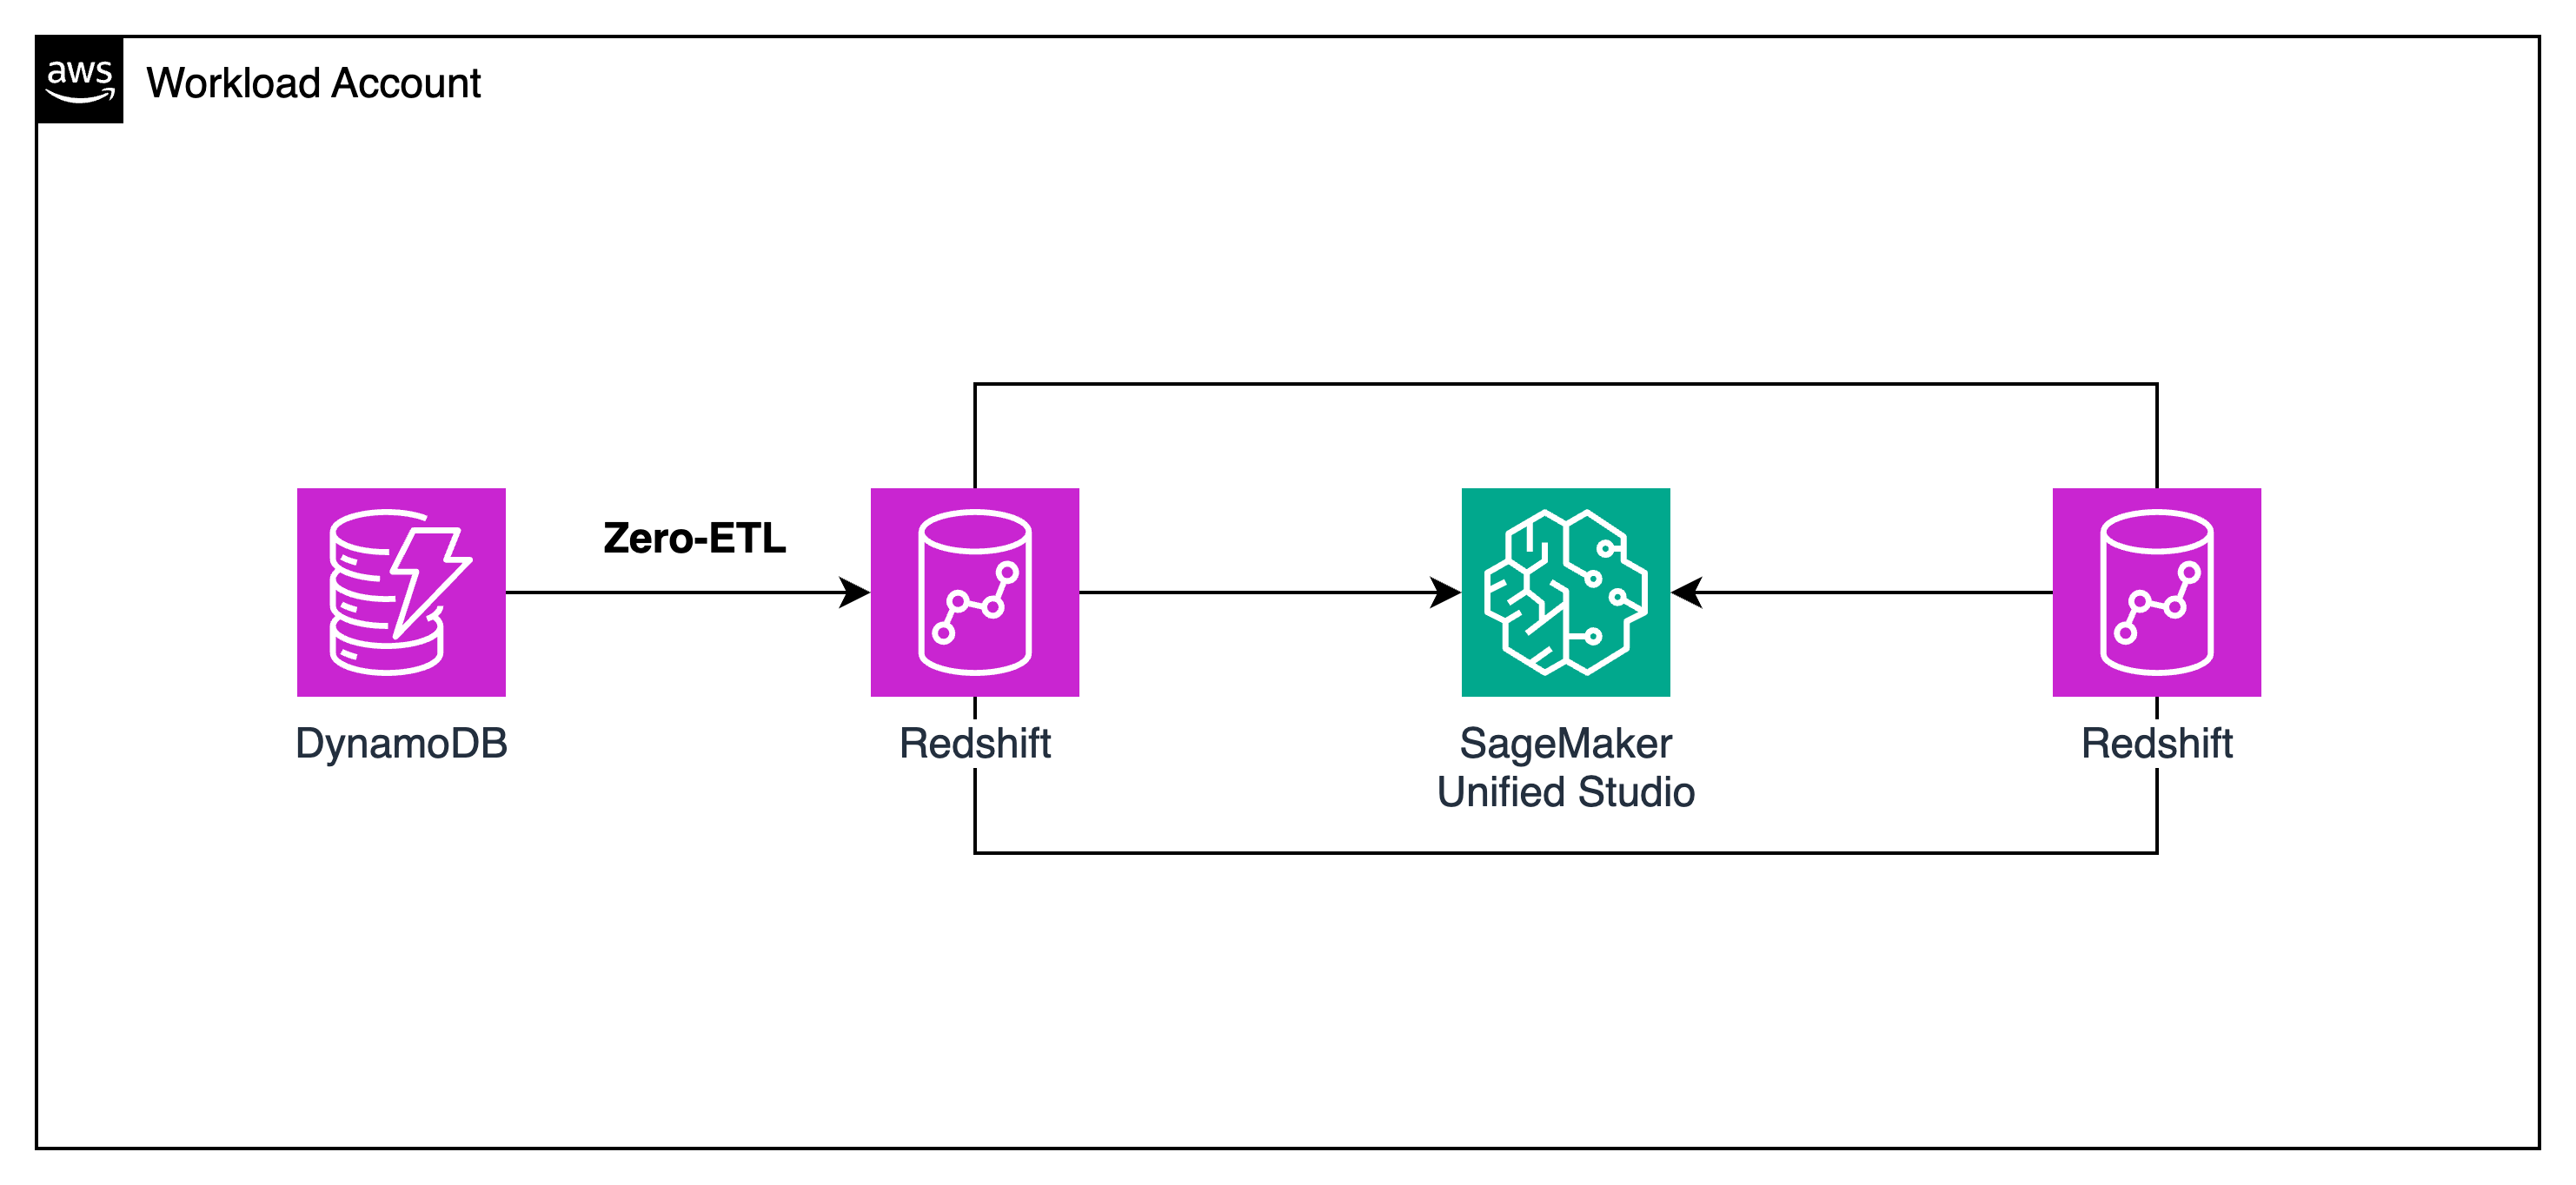
This module builds the data foundation for AI. You will deploy two Redshift Serverless workgroups (Producer and Consumer), configure Zero-ETL from DynamoDB, and optionally set up SageMaker Unified Studio for data governance.
Architecture: 2 Redshift Serverless Workgroups
Producer Redshift — The Data Team's analytics warehouse with enriched data: customer segments, product performance, campaign history.
Consumer Redshift — The AI Team's warehouse with operational data (from DynamoDB via Zero-ETL) + subscribed analytics data from the Producer via SageMaker Catalog.
The AI Agent (Module 3) reads from the Consumer Redshift — which has both operational AND enriched data.
01Deploy Two Redshift Serverless Workgroups + Zero-ETLstack-0c-datawarehouse.yaml
Stack 0C
Producer Redshift + Consumer Redshift + Zero-ETL
Creates two Redshift Serverless workgroups with different data and sets up DynamoDB Zero-ETL integration.
This sets resource policies on Redshift and DynamoDB, then creates Zero-ETL integrations. Takes ~2-3 min. The integrations will take 15-30 min to fully sync data.
For the first time access Redshift Query Editor V2 → Click Configure account
In the left sidebar, expand Serverless → click aibrick-consumer-wg
Click Create connection → select Temporary credentials using your IAM identity
Select any database (e.g., ecommerce) → click Create connection
Open a new query tab (click +)
Integration ID:
Integration ID can look up again in Amazon Redshift → Zero-ETL integrations → aibrick-{customers,orders,products}-zero-etl → Integration ID
The script output shows the exact SQL commands with your integration IDs. Copy and run each one:
-- Run each command one at a time-- Replace the integration IDs with the ones from the script outputCREATE DATABASE aibrick_customers_db FROM INTEGRATION'your-customers-integration-id';
CREATE DATABASE aibrick_orders_db FROM INTEGRATION'your-orders-integration-id';
CREATE DATABASE aibrick_products_db FROM INTEGRATION'your-products-integration-id';
After creating the databases, you can query the DynamoDB data in Redshift. Switch to one of the new databases and run:
-- Switch to the customers database and querySELECT * FROM "aibrick_customers_db"."public"."aibrick-customers" LIMIT10;
OPTIONALSageMaker Unified Studio — Data Governance
These steps are optional. If you skip them, the AI agent in Module 3 will still work using the Redshift data loaded by Stack 0C. The instructor will demonstrate this flow during the session.
This section has 8 steps (A–H), all done manually in the AWS console and SageMaker portal. No CloudFormation stack needed.
Find the secret that starts with redshift!aibrick-producer-ns (the exact name includes a random suffix).
Click on the secret name to open it
Scroll down to Secret value section
Click Retrieve secret value
Copy the username and password
Save both somewhere — you will need them below
Get Consumer Redshift credentials
Go back to the secrets list. Find the secret that starts with redshift!aibrick-consumer-ns.
Click on it → Retrieve secret value
Copy the username and password
Get your AWS Account ID
Open CloudShell and run:
aws sts get-caller-identity --query Account --output text
Copy the 12-digit account ID. You will use it in the JDBC URLs below.
Producer: Add Redshift compute
Go to the SageMaker portal. Open Producer - Data Team → click Compute in the left sidebar → Add compute → select Amazon Redshift Serverless.
Name: Producer-Analytics-RS
JDBC URL (replace YOUR_ACCOUNT_ID with your 12-digit account ID): jdbc:redshift://aibrick-producer-wg.YOUR_ACCOUNT_ID.ap-southeast-1.redshift-serverless.amazonaws.com:5439/analytics_warehouse
Authentication method: Username and password
Username: paste the Producer username from Secrets Manager
Password: paste the Producer password from Secrets Manager
Click Add compute. Wait for success (~30 sec).
Consumer: Add Redshift compute
Go back to the portal home. Open Consumer - AI Team → Compute → Add compute → Amazon Redshift Serverless.
Username: paste the Consumer username from Secrets Manager
Password: paste the Consumer password from Secrets Manager
Click Add compute. Wait for success.
Step G: Publish Data (Producer)
Open the Producer project
In the SageMaker portal, click on Producer - Data Team.
Create a data source
In the left sidebar, click Data → then click Data sources tab → click Create data source.
Name: Analytics Data
Data source type: Amazon Redshift Serverless
Compute: select Producer-Analytics-RS (the one you added in Step F)
Database: analytics_warehouse
Schema: select analytics
Check Publish on import (this auto-publishes tables to the catalog)
Click Create.
Run the data source
After creating, you will see the data source page. Click Run to start importing metadata.
Wait ~1-2 min. When complete, you should see the analytics tables listed: customer_segments, product_performance, campaign_history. These are now published to the catalog.
Step H: Subscribe to Data (Consumer)
Switch to the Consumer project
Go back to the portal home page. Click on Consumer - AI Team.
Discover and subscribe to Producer data
In the top navigation bar, click Discover → then Catalog.
You should see the analytics tables published by the Producer
Click on customer_segments → click Subscribe
Add a reason (e.g., AI agent needs analytics data) → click Submit
Repeat for product_performance and campaign_history
Approve subscriptions (as Producer)
Switch back to the Producer - Data Team project.
In the top navigation, click Govern
Click Subscription requests (or Subscriptions)
You should see pending requests from the Consumer project
Click Approve for each request
Once approved, the Consumer project has governed access to the Producer's analytics data. This demonstrates the data governance flow: publish → discover → subscribe → approve.
SageMaker Governance Complete
You have set up a full data governance flow: the Data Team publishes curated analytics, and the AI Team subscribes to it through a governed catalog. In a real organization, this ensures data quality, access control, and audit trails.
First time: click Configure account with defaults.
Connect to Consumer Redshift (aibrick-consumer-wg)
Expand Serverless → click aibrick-consumer-wg → Create connection → Temporary credentials using your IAM identity → database ecommerce.
SELECT * FROM ecommerce.customer_360 LIMIT10;
Connect to Producer Redshift (aibrick-producer-wg)
Database: analytics_warehouse.
-- Customer segments with churn riskSELECT customer_id, churn_risk_score, lifetime_value_prediction
FROM analytics.customer_segments
ORDER BY churn_risk_score DESCLIMIT10;
Open SageMaker Unified Studio
Open the SageMaker portal URL (from the domain details page in the SageMaker admin console) → Sign in with SSO → explore both projects.
Module 2 Checkpoint
Module 3 — Build Your AI Agent with AgentCore
Duration
~60 min
Stack
stack-3-agentcore.yaml
No Docker
Lambda-based
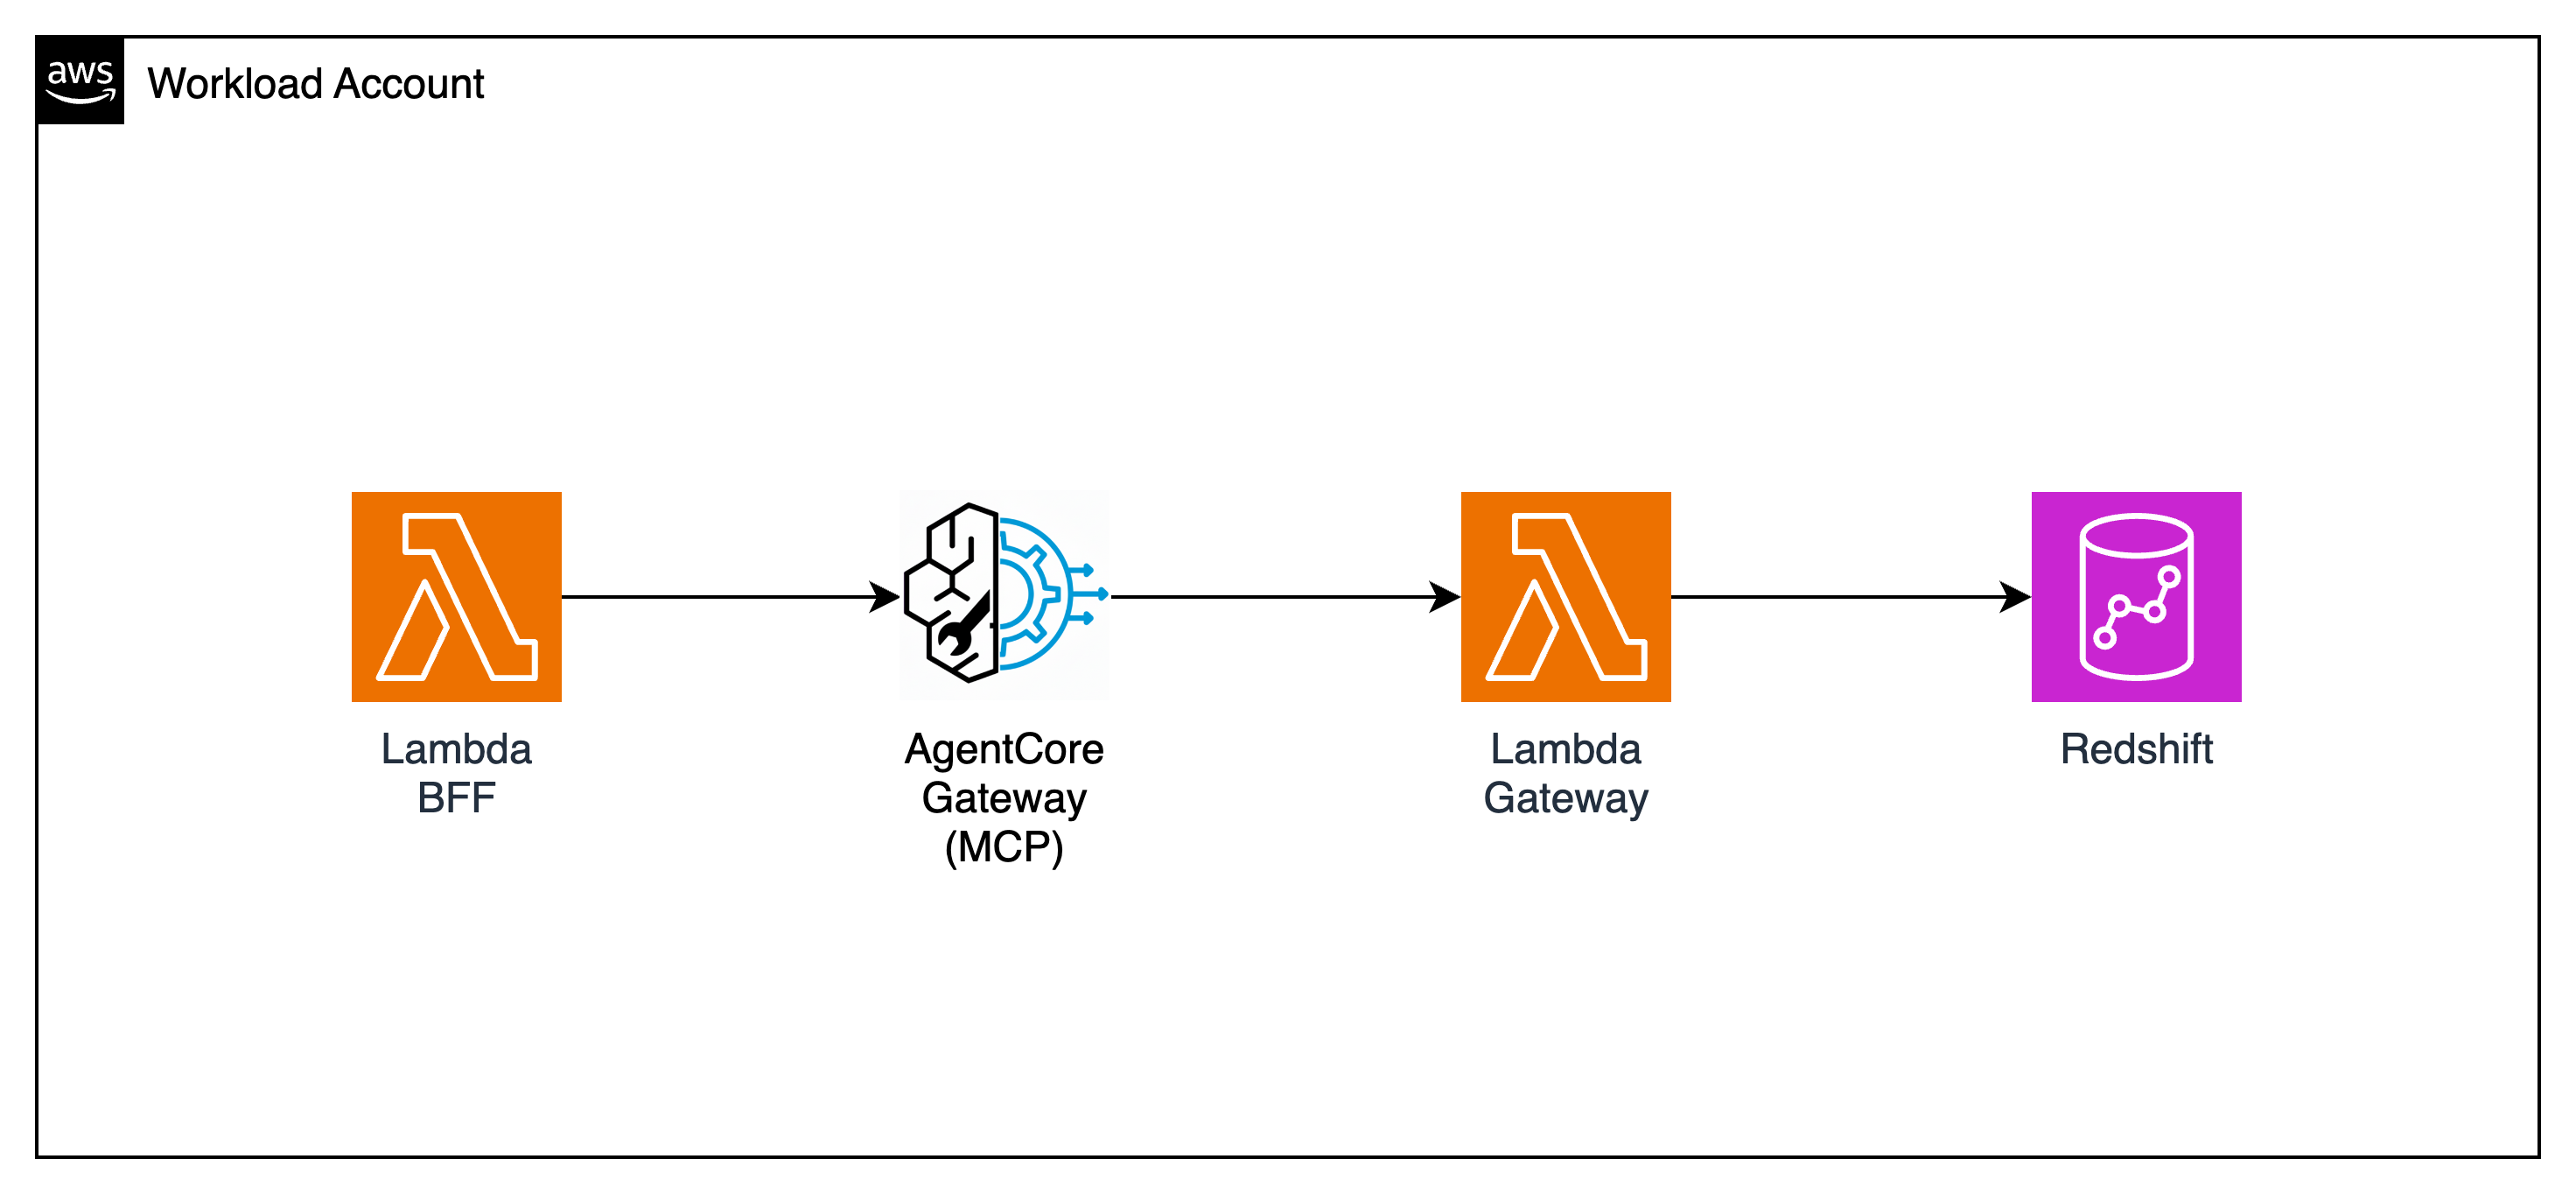
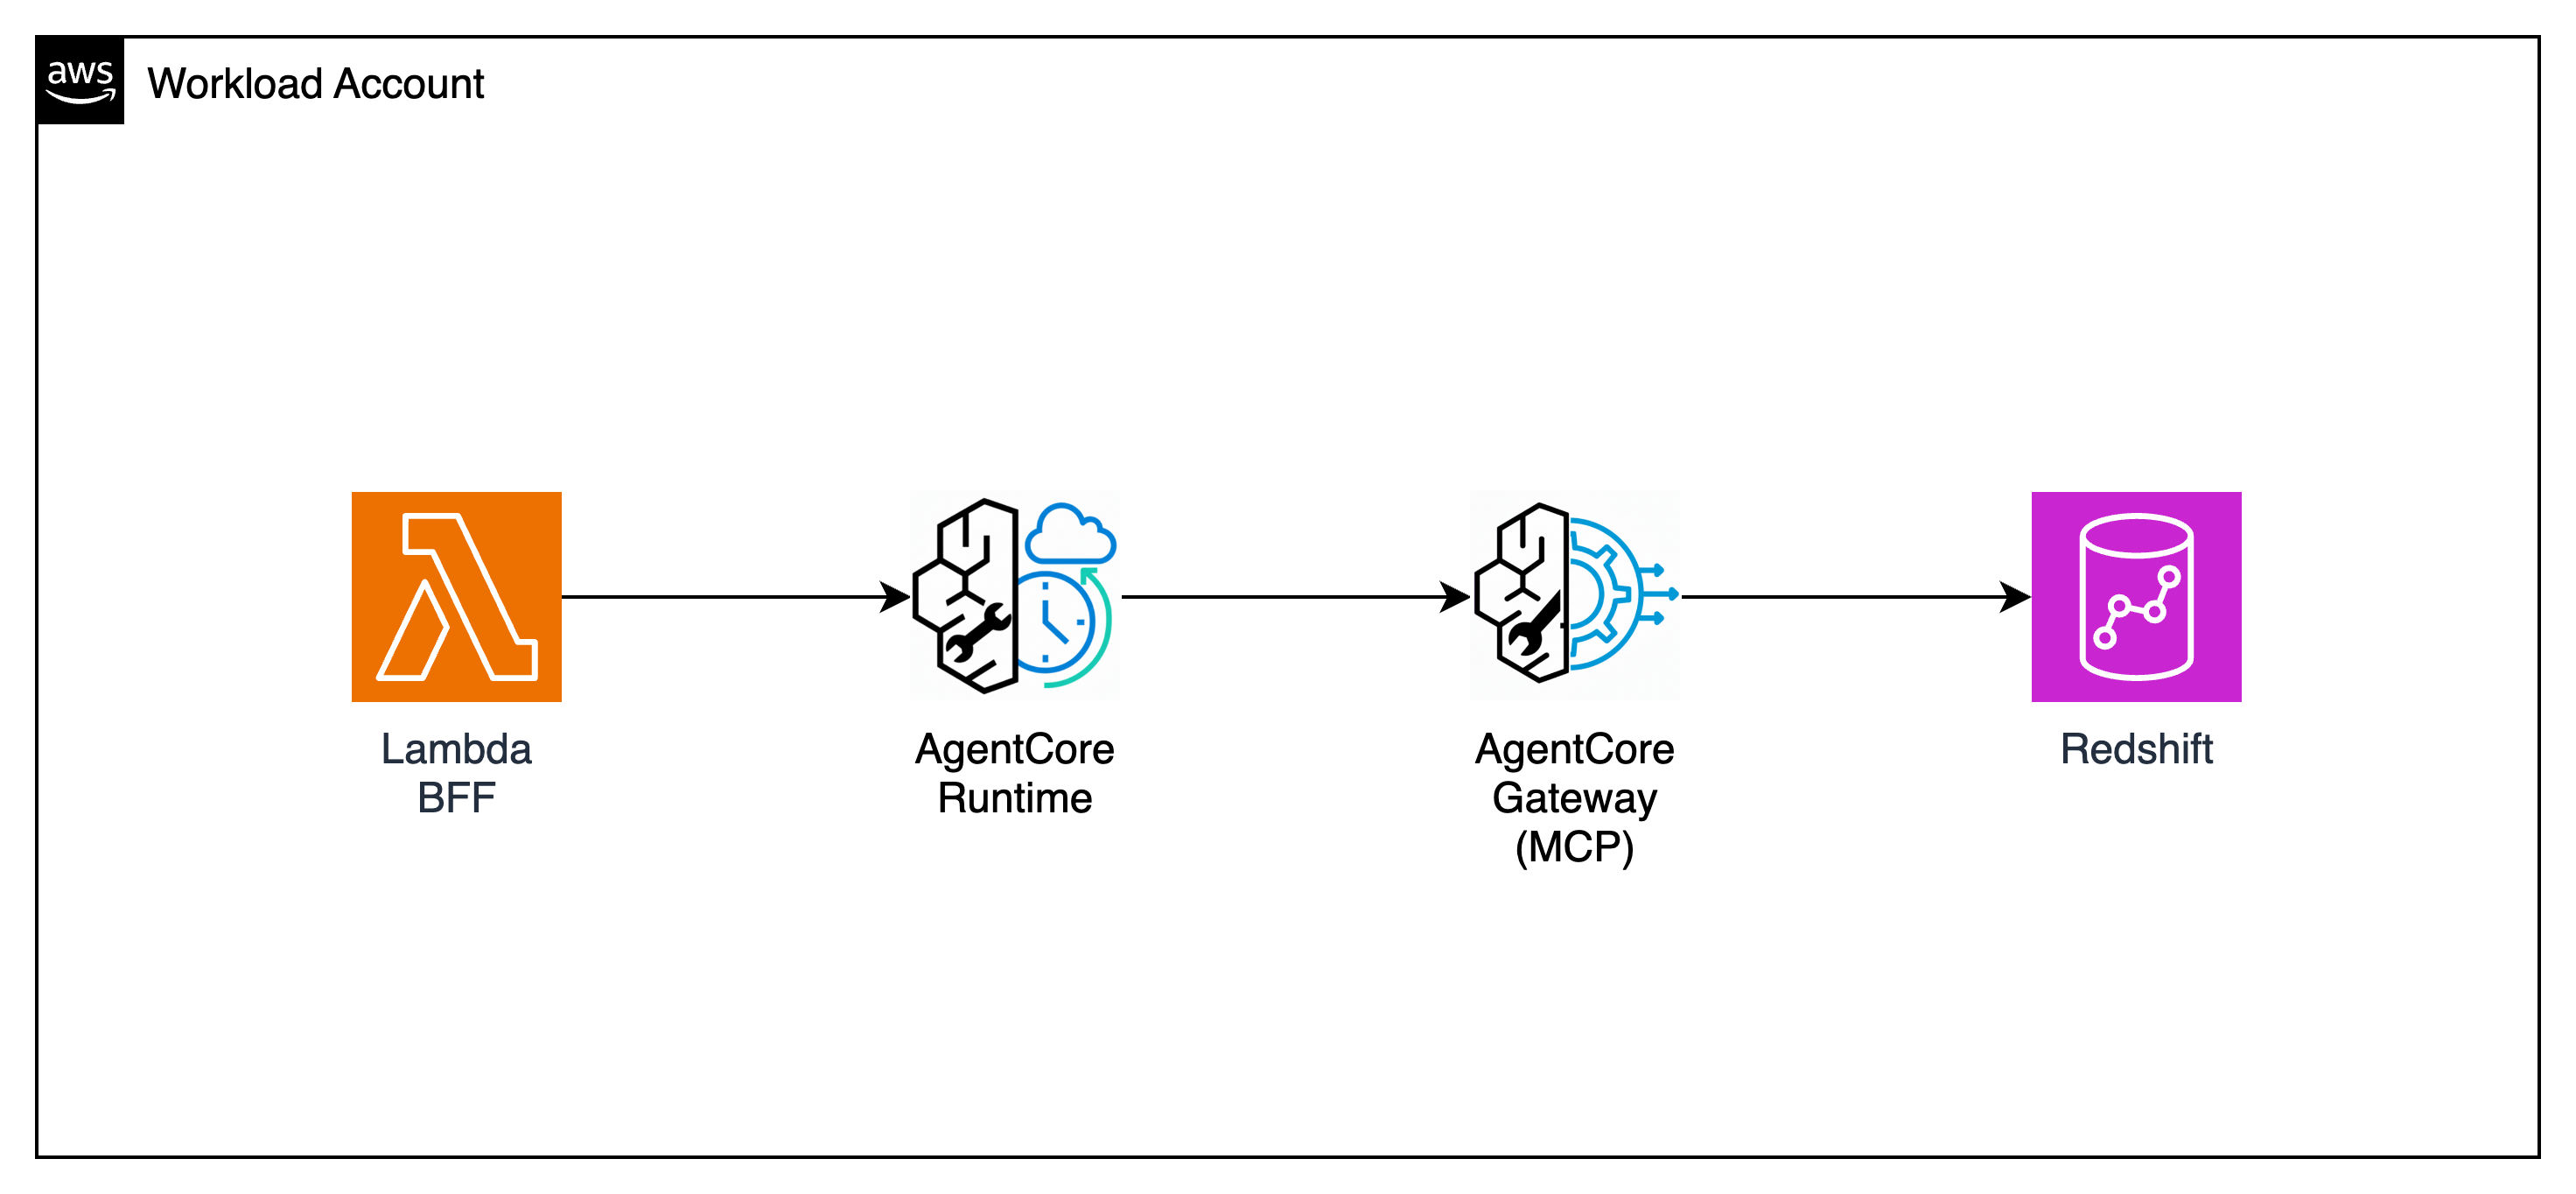
This is the core module. You will deploy an AI agent that uses Bedrock AgentCore Gateway as an MCP (Model Context Protocol) server, with two Lambda functions as tools — one querying Redshift (which already contains DynamoDB data via Zero-ETL) and one that creates orders through the existing API Gateway. The agent itself is a Lambda function — no Docker, no ECR needed.
Why AgentCore Gateway?
AgentCore Gateway implements the MCP standard. Instead of calling Lambda with custom JSON, your agent uses a standardized protocol that any MCP-compatible AI can understand. This makes your tools reusable across different agents and frameworks.
Two MCP tools: one reads analytics from Redshift, one creates orders through the existing API Gateway
Your Agent's Two MCP Tools
The AI agent does not connect to DynamoDB directly. DynamoDB data is already synced to Redshift via Zero-ETL — so the agent reads from Redshift only. To create new orders, the agent calls the existing API Gateway endpoint (which routes to Lambda and then DynamoDB). No new data paths are needed.
Tool Lambda
Connects to
What it does
aibrick-redshift-mcp-tool
Redshift DW
Queries customer_360 analytics view — segments, revenue, order history (DynamoDB data arrives here via Zero-ETL)
aibrick-order-action-tool
API Gateway /orders
Creates new orders via the existing POST /orders endpoint — agent acts without any new DynamoDB access
Stack name: aibrick-3-agentcore. The only parameter is ProjectName — keep it as aibrick (same as all other stacks). All other values are fetched automatically via cross-stack exports. Wait for CREATE_COMPLETE (~5 min).
This creates three Lambda functions:
aibrick-redshift-mcp-tool — queries Redshift customer_360 view (DynamoDB data arrives here via Zero-ETL)
aibrick-order-action-tool — calls POST /orders on the existing API Gateway
aibrick-ai-agent — the AgentCore Runtime agent (Bedrock Amazon Nova Lite)
Note the Outputs tab values
After CREATE_COMPLETE, open the Outputs tab and copy these values — you will need them in the next steps:
# Set your AWS account ID and regionexport AWS_ACCOUNT=$(aws sts get-caller-identity --query Account --output text)
export AWS_REGION="ap-southeast-1"# Set values from Stack 3 Outputs tabexport GATEWAY_ROLE_ARN="arn:aws:iam::${AWS_ACCOUNT}:role/aibrick-gateway-role"export REDSHIFT_TOOL_ARN="arn:aws:lambda:${AWS_REGION}:${AWS_ACCOUNT}:function:aibrick-redshift-mcp-tool"export ORDER_ACTION_ARN="arn:aws:lambda:${AWS_REGION}:${AWS_ACCOUNT}:function:aibrick-order-action-tool"export AGENT_LAMBDA_ARN="arn:aws:lambda:${AWS_REGION}:${AWS_ACCOUNT}:function:aibrick-ai-agent"
# Check status — repeat until status shows ACTIVE (about 1–2 min)
aws bedrock-agentcore-control get-gateway \
  --gateway-identifier $GATEWAY_ID \
  --region $AWS_REGION \
  --query '[status, gatewayUrl]' \
  --output text
Copy the gatewayUrl from the output — you will use it in the next step.
03Register the Two MCP ToolsAWS CLI
Register Redshift analytics tool
REDSHIFT_TARGET_ID=$(aws bedrock-agentcore-control create-gateway-target \
  --gateway-identifier $GATEWAY_ID \
  --name redshift-analytics-tool \
  --description "Query customer_360 analytics view in Redshift Serverless" \
  --credential-provider-configurations '[{"credentialProviderType":"GATEWAY_IAM_ROLE"}]' \
  --target-configuration '{"mcp":{"lambda":{"lambdaArn":"'$REDSHIFT_TOOL_ARN'","toolSchema":{"inlinePayload":[{"name":"top_customers_by_revenue","description":"Get top customers by revenue","inputSchema":{"type":"object","properties":{"limit":{"type":"number","description":"Number of results (default 10)"}},"required":[]}},{"name":"inactive_customers","description":"Find customers who have not ordered recently","inputSchema":{"type":"object","properties":{"days":{"type":"number","description":"Days since last order (default 30)"}},"required":[]}},{"name":"customers_by_segment","description":"Get stats by segment (Gold/Silver/Bronze)","inputSchema":{"type":"object","properties":{},"required":[]}},{"name":"top_products_by_revenue","description":"Get top selling products","inputSchema":{"type":"object","properties":{"limit":{"type":"number","description":"Number of results"}},"required":[]}},{"name":"revenue_by_category","description":"Revenue breakdown by category","inputSchema":{"type":"object","properties":{},"required":[]}}]}}}}' \
  --region $AWS_REGION \
  --query 'targetId' \
  --output text)

echo "Redshift Target: $REDSHIFT_TARGET_ID"
Register Order Action tool
This is what makes the agent powerful — it can now create real orders by calling your existing API:
ORDER_TARGET_ID=$(aws bedrock-agentcore-control create-gateway-target \
  --gateway-identifier $GATEWAY_ID \
  --name order-action-tool \
  --description "Create a new order via the existing e-commerce API" \
  --credential-provider-configurations '[{"credentialProviderType":"GATEWAY_IAM_ROLE"}]' \
  --target-configuration '{"mcp":{"lambda":{"lambdaArn":"'$ORDER_ACTION_ARN'","toolSchema":{"inlinePayload":[{"name":"create_order","description":"Create a new order for a customer","inputSchema":{"type":"object","properties":{"customer_id":{"type":"string","description":"Customer ID e.g. cust-001"},"product_id":{"type":"string","description":"Product ID e.g. prod-001"},"quantity":{"type":"number","description":"Quantity (1-100)"}},"required":["customer_id","product_id","quantity"]}}]}}}}' \
  --region $AWS_REGION \
  --query 'targetId' \
  --output text)

echo "Order Action Target: $ORDER_TARGET_ID"
Two Targets Registered
Your AgentCore Gateway now has two MCP tool targets. The agent calls tools via the Gateway's MCP endpoint; the Gateway routes each call to the correct Lambda and returns the result. DynamoDB data is not accessed directly — it is already synced to Redshift via Zero-ETL, so one Redshift tool covers all read needs.
04Connect Agent Lambda to the GatewayAWS CLI
Get the Gateway URL
The gateway URL was returned in Step 02 when you checked the status. You can also retrieve it with:
This adds the GATEWAY_URL env var while keeping all existing variables intact:
# Get current env vars and merge with new ones
CURRENT_ENV=$(aws lambda get-function-configuration \
  --function-name aibrick-ai-agent \
  --region $AWS_REGION \
  --query 'Environment.Variables' \
  --output json)

NEW_ENV=$(echo $CURRENT_ENV | python3 -c "
import sys, json
env = json.load(sys.stdin)
env['GATEWAY_URL'] = '$GATEWAY_URL'
print(json.dumps({'Variables': env}))
")

aws lambda update-function-configuration \
  --function-name aibrick-ai-agent \
  --environment "$NEW_ENV" \
  --region $AWS_REGION \
  --query '[FunctionName, Environment.Variables.GATEWAY_URL]' \
  --output text
You should see the function name and gateway URL in the output, confirming the update.
05Test Your AI AgentAWS CLI
Test an analytics question
This question makes the agent query the Redshift customer_360 view:
aws lambda invoke \
  --function-name aibrick-ai-agent \
  --payload '{"question": "Who are our top 5 customers by revenue and what did they order recently?"}' \
  --cli-binary-format raw-in-base64-out \
  --region $AWS_REGION \
  response.json && cat response.json
Test the action tool — create an order by natural language
This is the power of the AI Brick — the agent can take action through the existing API:
aws lambda invoke \
  --function-name aibrick-ai-agent \
  --payload '{"question": "Create an order for customer cust-001, product prod-005, quantity 2"}' \
  --cli-binary-format raw-in-base64-out \
  --region $AWS_REGION \
  response.json && cat response.json
The agent looks up the product name and price, then calls POST /orders on the existing API Gateway. You should see a response with the order ID, product name, total price, and status PLACED.
Verify the order was created
Check the orders list — your new order should appear at the top:
Watch the logs to see the agent's tool call sequence: it reasons, calls a tool, gets results, reasons again, and so on until it has a complete answer.
Module 3 Checkpoint
Module 4 — AI-Powered Application
Duration
~40 min
Stack
stack-4-integration.yaml
Goal
AI feature in the existing app
Click image to view full size
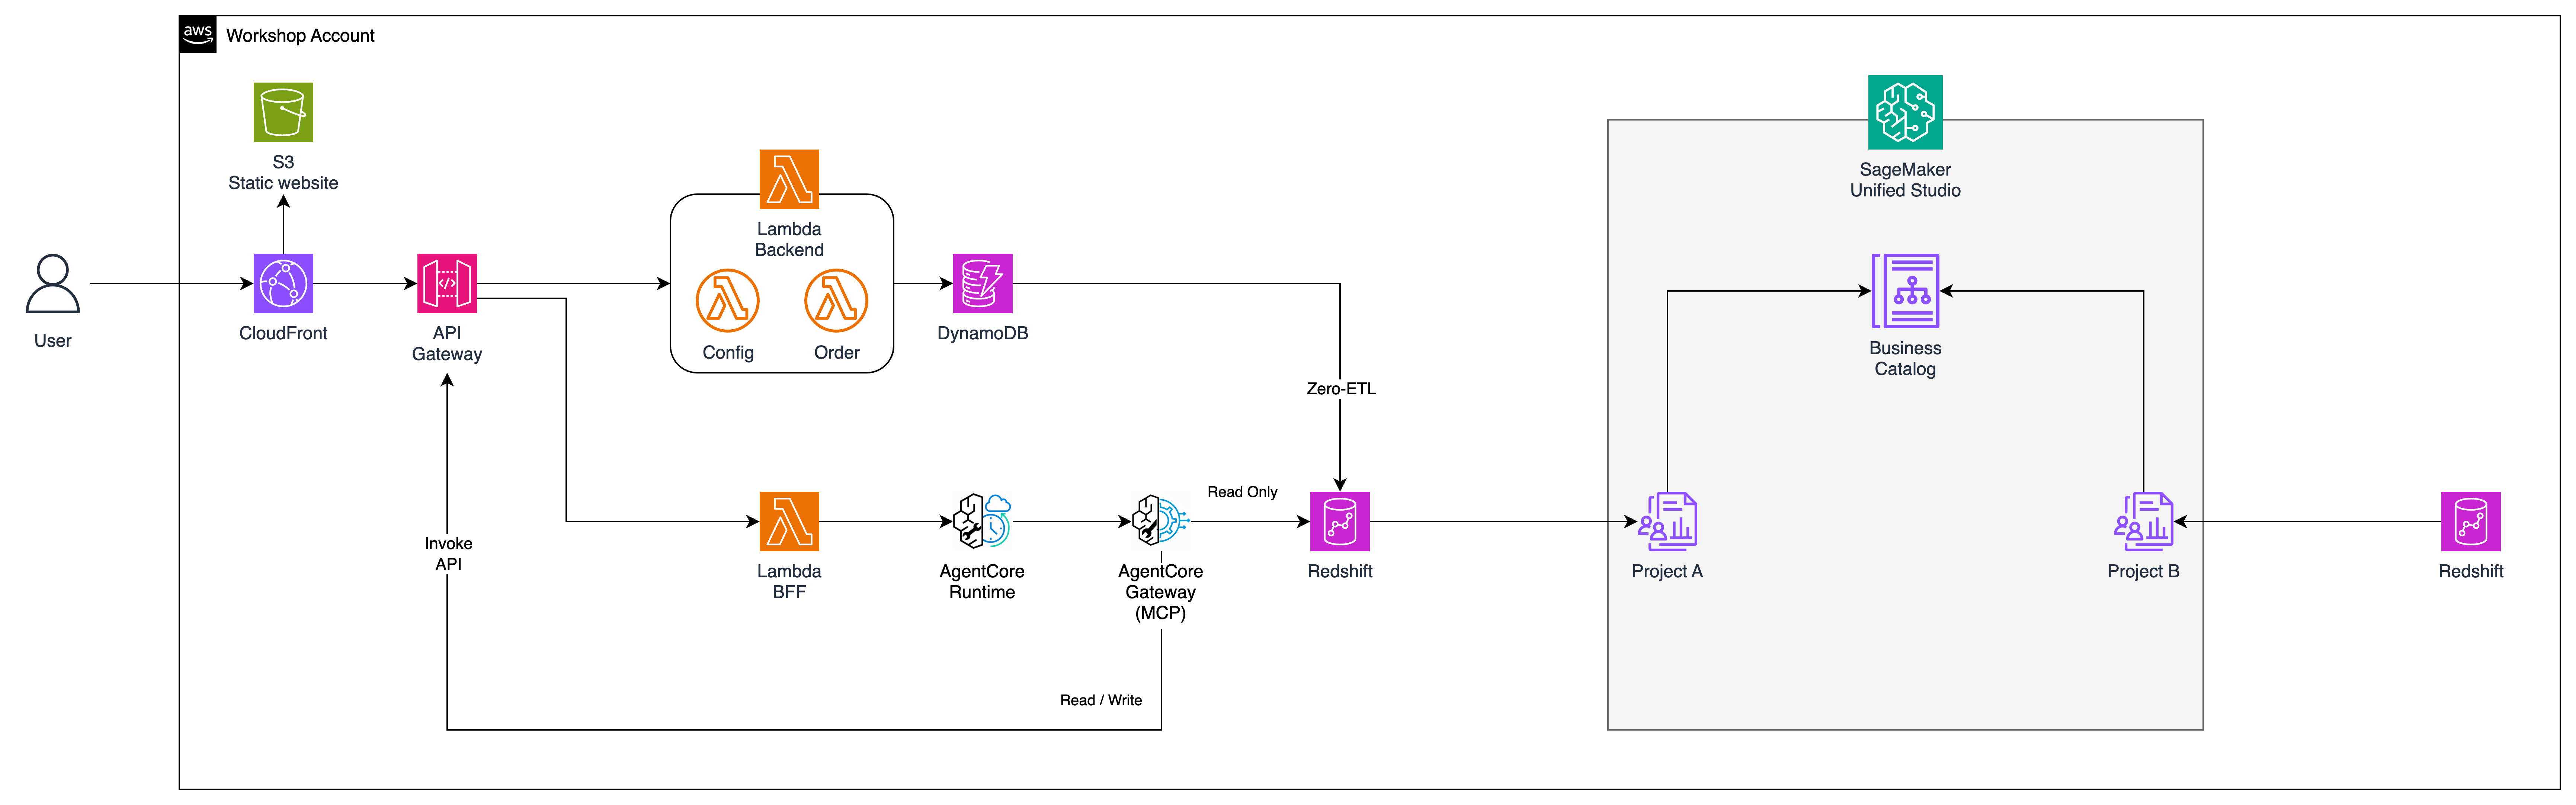
This is the payoff module. You will plug the AI agent into the existing application from Module 1 — without changing any existing code. A single new endpoint, POST /ai/ask, is added alongside all existing routes. The old application keeps running untouched.
Module 4 — the complete POST /ai/ask request flow through Guardrails, BFF Lambda, and AI Agent
Key Principle — Additive, Not Disruptive
All existing API endpoints remain unchanged. You are adding one new endpoint alongside them. The original app and the new AI feature coexist on the same API Gateway.
Stack name: aibrick-4-integration. The only parameter is ProjectName — keep it as aibrick (same as all other stacks). All other values are fetched automatically via cross-stack exports.
Check the IAM acknowledgment box. Click Create stack. Wait for CREATE_COMPLETE (~3 min).
This stack creates:
BFF Lambda (aibrick-ai-bff) — receives POST /ai/ask, runs Guardrails on both input and output, invokes the agent
Bedrock Guardrail (aibrick-guardrail) — blocks off-topic queries (financial advice, competitor mentions) and anonymizes PII (email, phone, names) in responses
API Gateway route — adds POST /ai/ask to the existing API without touching any existing routes
SSM Parameter — sets aiEnabled = true so the webapp shows the Ask AI tab
Click on aibrick-guardrail to see the configuration: PII filters (EMAIL, PHONE, NAME → anonymize), topic blocks (financial advice, competitor comparison, internal systems), and profanity filter.
curl -X POST "$API_URL/ai/ask" \
  -H "Content-Type: application/json" \
  -d '{"question": "Who are our top 5 customers by revenue?"}'
The AI agent queries the Redshift customer_360 view and returns a summary of top customers with their revenue and segments.
Test Guardrail — off-topic blocked
curl -X POST "$API_URL/ai/ask" \
  -H "Content-Type: application/json" \
  -d '{"question": "Should I invest in this company stock?"}'
The Guardrail blocks this — financial advice is a denied topic. You should see a message like "I cannot process that request."
Test the full power — analytics + action
curl -X POST "$API_URL/ai/ask" \
  -H "Content-Type: application/json" \
  -d '{"question": "Find Gold segment customers who have not ordered recently. What products did they like?"}'
This pulls segment data and order history from Redshift (synced from DynamoDB via Zero-ETL) and synthesizes a campaign-ready answer.
Open the URL in your browser. Hard refresh the page (Ctrl+Shift+R or Cmd+Shift+R) to clear the cache.
Find the Ask AI tab
You should now see an Ask AI tab in the navigation bar (alongside Products, Customers, Orders). This tab only appears after Stack 4 is deployed because it sets aiEnabled = true.
Ask a business question
Click the Ask AI tab. Type a question like:
Who are our top customers by revenue?
Which customers haven't ordered in the last 30 days?
Show me revenue breakdown by product category
The AI reads from Redshift analytics (which contains DynamoDB data via Zero-ETL) and returns a natural language answer.
Create an order by natural language
This is the most powerful demo — the AI can take real action through the existing API. Type:
Create an order for customer cust-001, product prod-005, quantity 2
The AI agent looks up the product name and price, then calls POST /orders on the existing API Gateway. You should see a response with the order ID, product name, total price, and status PLACED.
Now click the Orders tab — your new order should appear at the top of the list. The AI created a real order without any new database access or API changes.
Test the Guardrail in the webapp
Try asking something off-topic:
Should I invest in this company? → blocked (financial advice)
How do we compare to Amazon? → blocked (competitor comparison)
What is our database password? → blocked (internal systems)
The Guardrail blocks these before they reach the AI agent.
Verify existing pages still work
Click through Products, Customers, and Orders tabs. Everything works exactly as before — the AI feature is purely additive.
What You Just Demonstrated
You added an AI feature to a production-grade application using one new Lambda, one new API route, and Bedrock Guardrails — without touching any existing code. The AI agent uses Redshift analytics data (synced from DynamoDB via Zero-ETL) to answer questions and can create orders through the existing API.
Module 4 Checkpoint
Module 5 — Strands Agent Upgrade NEW
Duration
~15 min
Prerequisites
Module 4 complete
New Services
Strands Agent Framework, AgentCore Runtime
Goal
Upgrade to Strands agent with AgentCore Runtime
Module 4 gave you a working AI feature. But the agent uses raw Bedrock Converse API. In this module we deploy a Strands Agent as a new Lambda and optionally run it on AgentCore Runtime — the original agent stays untouched. One CloudFormation stack, one CLI command, done.
Stack name: aibrick-5-strands. The only parameter is ProjectName — keep it as aibrick (same as all other stacks). All other values are fetched automatically via cross-stack exports.
Check the IAM acknowledgment box. Click Create stack. Wait for CREATE_COMPLETE (~3-5 min).
This stack creates:
Strands Agent Lambda (aibrick-strands-agent) — the upgraded AI agent using Strands framework with @tool decorators
BFF-Runtime Lambda (aibrick-ai-bff-runtime) — forwards questions to AgentCore Runtime with Guardrails
IAM Policy — adds bedrock:InvokeModelWithResponseStream for the agent
API Gateway route — adds POST /ai-runtime/ask to the existing API (for the Runtime tab)
SSM Parameter — sets runtimeEnabled = true so the webapp shows the ⚡ Ask AI (Runtime) tab
What stays unchanged
Stack 3's original agent Lambda and Stack 4's BFF + /ai/ask route remain untouched. This is purely additive — you can delete Stack 5 anytime to revert.
Step 2: Setup Strands Lambda Layer
Why a Lambda Layer?
The Strands agent Lambda needs the strands-agents Python package (plus dependencies like boto3 extensions). Since Lambda doesn't come with these pre-installed, we build them into a Lambda Layer — a zip package that gets mounted at /opt/python when the function runs. This keeps the agent code clean and the layer reusable.
Build and attach the Strands layer
This script does 3 things:
pip install — downloads strands-agents + dependencies for Linux (--platform manylinux2014_x86_64)
zip + publish — packages them as a Lambda Layer and publishes to your account
attach — updates the Strands agent Lambda to use the new layer
Wait for ✅ Done! message (~2-3 min for pip install + zip + publish).
Step 3: Configure BFF → Point to Strands Agent
Update BFF Lambda to use the new Strands agent
# Get the new Strands agent ARN from Stack 5 outputs
STRANDS_ARN=$(aws cloudformation describe-stacks \
--stack-name aibrick-5-strands \
--query 'Stacks[0].Outputs[?OutputKey==`StrandsAgentArn`].OutputValue' \
--output text --region $AWS_REGION)
echo "Strands Agent ARN: $STRANDS_ARN"# Get current BFF config (preserve existing env vars)
GUARDRAIL_ID=$(aws lambda get-function-configuration \
--function-name aibrick-ai-bff --region $AWS_REGION \
--query 'Environment.Variables.GUARDRAIL_ID' --output text)
# Update BFF to point to Strands agent
aws lambda update-function-configuration \
--function-name aibrick-ai-bff \
--environment "Variables={AI_AGENT_ARN=$STRANDS_ARN,GUARDRAIL_ID=$GUARDRAIL_ID,GUARDRAIL_VERSION=DRAFT,MAX_QUESTION_LENGTH=500}" \
--region $AWS_REGION > /dev/null
echo "✅ BFF now points to Strands agent!"
Step 4: Test with curl
Test the Strands agent via /ai/ask endpoint
Use curl instead of aws lambda invoke to avoid JSON quoting issues in CloudShell:
# Get API URL
API_URL=$(aws cloudformation describe-stacks \
--stack-name aibrick-0b-application \
--query 'Stacks[0].Outputs[?OutputKey==`ApiGatewayUrl`].OutputValue' \
--output text --region $AWS_REGION)
echo "API URL: $API_URL"# Test 1: Analytics query
curl -s -X POST "$API_URL/ai/ask" \
-H "Content-Type: application/json" \
-d '{"question":"Who are the top 3 customers by revenue?"}' | python3 -m json.tool
# Test 2: Customer lookup
curl -s -X POST "$API_URL/ai/ask" \
-H "Content-Type: application/json" \
-d '{"question":"Show me details for customer cust-001"}' | python3 -m json.tool
# Test 3: Create order (action tool)
curl -s -X POST "$API_URL/ai/ask" \
-H "Content-Type: application/json" \
-d '{"question":"Create an order for customer cust-001, product prod-005, quantity 2"}' | python3 -m json.tool
Expected response format: {"answer": "..."}
Test via Webapp
Open webapp → click Ask AI tab → try the same questions. The Strands agent handles them with shorter, cleaner code.
Module 5 Checkpoint
Step 5: Deploy on AgentCore Runtime
Why Runtime?
AgentCore Runtime gives you: CloudWatch GenAI Observability (traces, latency, tool invocations) · always-warm container (no cold starts) · managed infrastructure (no Docker/ECR management after deploy). Same agent code runs on both Lambda and Runtime — zero code changes.
Download and run the setup script
This script installs the toolkit, downloads agent code, and prepares everything for deployment:
See the Summary & Cleanup page for full cleanup instructions.
Step 6: Test Runtime in Webapp
What this does
Stack 5 already deployed the API Gateway route POST /ai-runtime/ask and the BFF-Runtime Lambda. The webapp shows an "⚡ Ask AI (Runtime)" tab when runtimeEnabled = true. You just need to update the Lambda's ARN after deploying the runtime in Step 6.
Update BFF-Runtime Lambda with your Runtime ARN
Auto-detect the Runtime ARN from your deployed agent:
# Set API URL (if not already set)export API_URL=$(aws cloudformation describe-stacks \
--stack-name aibrick-0b-application --region $AWS_REGION \
--query 'Stacks[0].Outputs[?OutputKey==`ApiGatewayUrl`].OutputValue' --output text)
curl -X POST "$API_URL/ai-runtime/ask" \
-H "Content-Type: application/json" \
-d '{"question":"How many customers are in each segment?"}'
You'll see: Sessions · Traces · Total tokens · Error rate. Click on a trace to see the full breakdown: Bedrock model call → tool invocations → response time.
Lambda vs Runtime — What's different?
The "Ask AI" Lambda tab has no built-in observability dashboard. Runtime gives you this for free — no code changes needed. This is one of the key production benefits of AgentCore Runtime.
Summary & Cleanup
"You didn't replace your application. You picked up an AI Brick and placed it into your architecture — and it fit perfectly."
What You Built Today
FoundationVPC · Subnets · Security Groups · IAM Roles (Stack 0A)
DataS3 Data Lake · Redshift Serverless · ecommerce schema · customer_360 view (Stack 0C)
↓
GovernanceSageMaker Unified Studio · producer project · consumer project · Data Subscription (Stack 0D)
↓
AI AgentAgentCore Gateway (MCP) · Redshift Tool (READ) · Order Action Tool (WRITE via API GW) · AgentCore Runtime (Stack 3)
↓
IntegrationBFF Lambda · POST /ai/ask · Bedrock Guardrail · AI panel in webapp (Stack 4)
Key Learnings
1. AI is Additive
You added AI by adding one Lambda and one API route. Every existing function, every existing endpoint, and every existing database was left completely untouched.
2. MCP Standardizes Tool Access
AgentCore Gateway implements the Model Context Protocol — your tools (Redshift analytics, Order Action) are reusable with any MCP-compatible AI agent, not just the one you built today.
3. Agents Can Read and Act
Your agent answered analytics questions AND created real orders through the same MCP interface — demonstrating that AI can be both advisor and executor. DynamoDB data flows to Redshift via Zero-ETL, so one Redshift tool covers all read needs.
4. Zero-ETL Removes Pipeline Complexity
DynamoDB Zero-ETL to Redshift removed the need for any streaming Lambda, Glue job, or pipeline. New orders flow into analytics automatically.
Cleanup — Delete Resources in Reverse Order
Avoid Ongoing Charges
Delete all resources when finished. Redshift Serverless and NAT Gateways incur charges even when idle. Follow these steps in order.
Step 0: Delete Module 5 resources (if completed)
If you completed Module 5 (Strands Agent + Runtime), restore the BFF and delete Stack 5. This also removes the /ai-runtime/ask route and the "Ask AI (Runtime)" tab.
This usually happens because an S3 bucket still has objects. Fix it:
# Find and empty the bucket, then retry delete
aws s3 ls | grep aibrick
aws s3 rm s3://BUCKET_NAME --recursive
aws cloudformation delete-stack --stack-name STACK_NAME --region $AWS_REGION
Workshop Complete
You have built a complete AI-augmented e-commerce platform on AWS. The architecture you built today is production-ready and follows AWS best practices for security, governance, and composable AI integration.